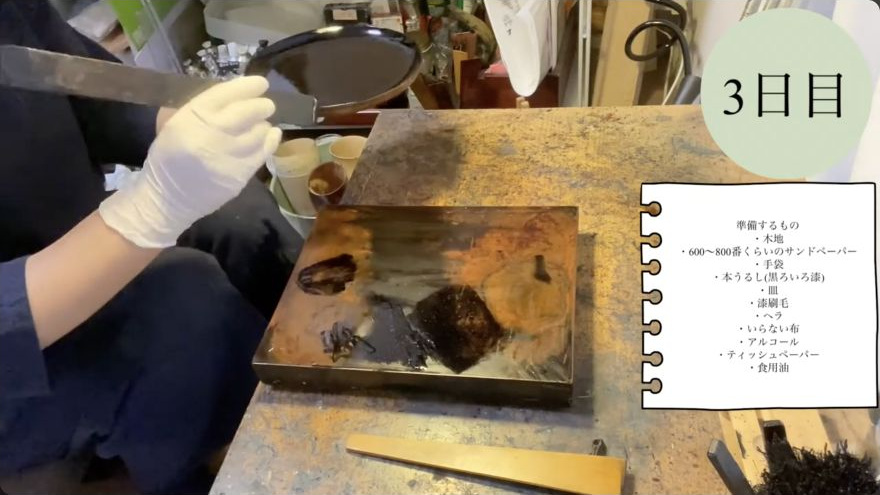
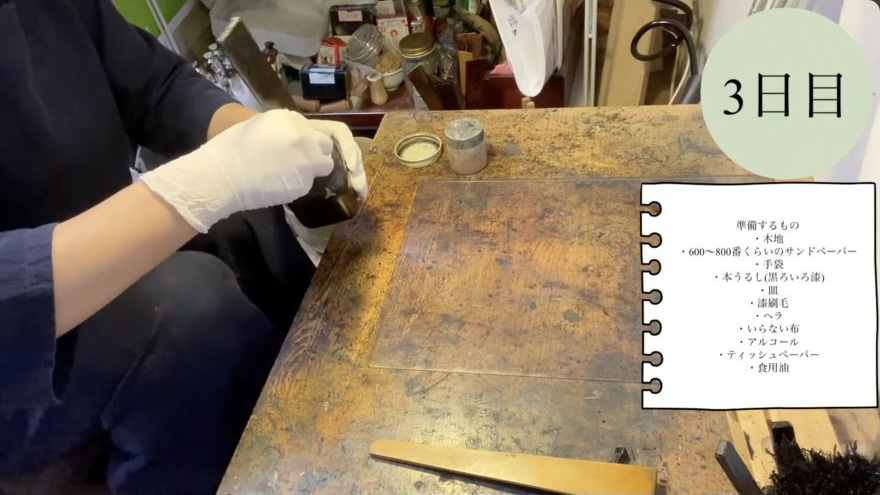
Naka-nuri (中塗) is the series of middle coats applied between the completed ground (shitaji) and the final coat (uwa-nuri). Each coat is a thin, even film of lacquer—typically kuro-urushi, roiro-urushi, or a coloured natural lacquer—laid with a hake, cured in a humidity-controlled cabinet, and abraded flat before the next coat is laid. The stage demands patience and consistency: the number of coats varies with the project, but the discipline of even application, controlled curing, and clean between-coat preparation is constant. A well-executed naka-nuri produces a surface that is optically uniform, free of the texture of the ground beneath, and ready to receive the final coat or to be polished to a mirror.
Prerequisites 4 checks before starting
The ground (shitaji) is fully cured, sanded flat, and free of cracks or raised cloth
A furo (curing cabinet) or a DIY humidity-controlled enclosure is available and pre-conditioned
The appropriate lacquer for the project is on hand and at working temperature
A hake of suitable width and stiffness is clean and free of old lacquer
This procedure involves direct contact with uncured urushi, which is a potent skin sensitiser with a delayed reaction. Work gloved and keep it off skin. Read Safety First before starting.
Raw urushi (ki-urushi) and all lacquer products contain urushiol, a potent skin sensitiser. Contact can cause a delayed allergic reaction (urushia-like dermatitis) that appears 12–72 hours after exposure and can be severe. Wear nitrile or neoprene gloves for every step that involves handling lacquer, sanding cured lacquer, or cleaning tools. Do not rely on latex gloves, which urushiol penetrates.
The reaction is cumulative: repeated small exposures build sensitivity over time, so a worker who has handled urushi for months may react more strongly than a beginner. If you notice itching, redness, or a rash on the hands or forearms, stop work, wash the area with soap and water, and seek medical attention if the reaction spreads.
When cleaning the hake with kerosene or white gasoline, work in a well-ventilated area and avoid skin contact with the solvent. The cooking-oil wash step should be done with gloves on, as the oil can trap residual urushiol against the skin.
Tools and materials 5 tools · 8 materials
Tools
hake (刷毛). Lacquer brush, approximately 3 cm wide for a medium-sized vessel; held at a low angle to the surface
wooden square block. Flat block wrapped with sandpaper for controlled, even abrasion; prevents the sandpaper from flexing and creating dips
hera (箆). Spatula for scraping lacquer off the hake during cleaning and for transferring excess lacquer back to the container
furo (風呂) or DIY curing enclosure. A sealed container with a wet towel and mesh rack to maintain 70–80 % relative humidity; or a dedicated humidity-controlled cabinet
wet towel and mesh or strainer. For the DIY curing setup: the towel provides moisture, the mesh elevates the workpiece above the water line
Materials
kuro-urushi or roiro-urushi. Black or polishing-grade black lacquer for the standard naka-nuri sequence; the specific grade depends on whether the final surface will be polished (roiro) or left as a wipe-on finish
white natural lacquer (shi-urushi). Used in place of black when the project calls for a light-coloured middle coat, as in the plate example
sandpaper 600–800 grit. For wet-sanding a wooden substrate between coats; wrapped around a flat block
film sandpaper 1500 and 2000 grit. For dry-sanding a ceramic or hard substrate between coats; finer because the surface is already hard
alcohol (isopropyl or denatured). For degreasing the surface and the hake bristles before application
white gasoline or kerosene. Solvent for rough-cleaning lacquer from the hake after use
cooking oil (vegetable or similar). Final wash for the hake to remove residual solvent and condition the bristles
lint-free cloth or dusting brush. For removing particulate matter before each coat
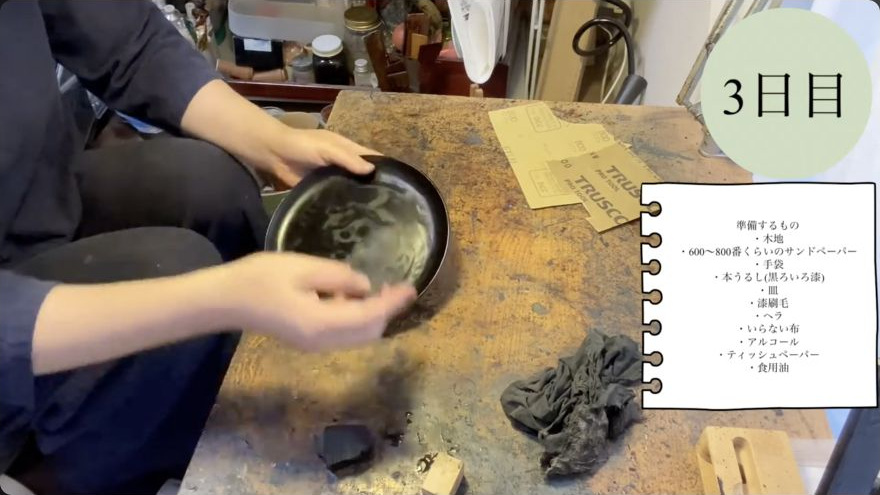
Wrap 600–800 grit sandpaper around a flat wooden block and wet the paper with water. Abrade the surface in one direction with steady, even pressure, wiping off slurry with a cloth after each pass. Rotate the workpiece 90 degrees and abrade in the perpendicular direction, including the edges, so that no single direction dominates. Once the surface is flat and free of bumps, wipe it thoroughly with alcohol to remove any oil or residue. Blow away loose dust, then dip a scrap of lint-free cloth in a small amount of lacquer and tap it lightly against the surface; the tack will pick up any remaining particles. Alternatively, sweep the surface with a clean dusting brush. The surface must be completely clean, dry, and free of particulate before the coat is applied.
When it is rightThe surface is flat to the touch, shows a uniform matte sheen from the alcohol wipe, and no dust or fibre is visible under raking light.
When it goes wrongIf dust or oil is trapped under the lacquer it creates pinholes, raised bumps, or a rough patch in the cured coat. Recovery: sand the affected area back to the previous layer, re-degrease, re-dust, and reapply the coat.
Workshop differences 1
On a ceramic or glass substrate the sanding grit is finer: 1500 then 2000 grit dry film sandpaper, because the surface is already hard and the goal is only to key the previous lacquer layer, not to remove material from the wood.
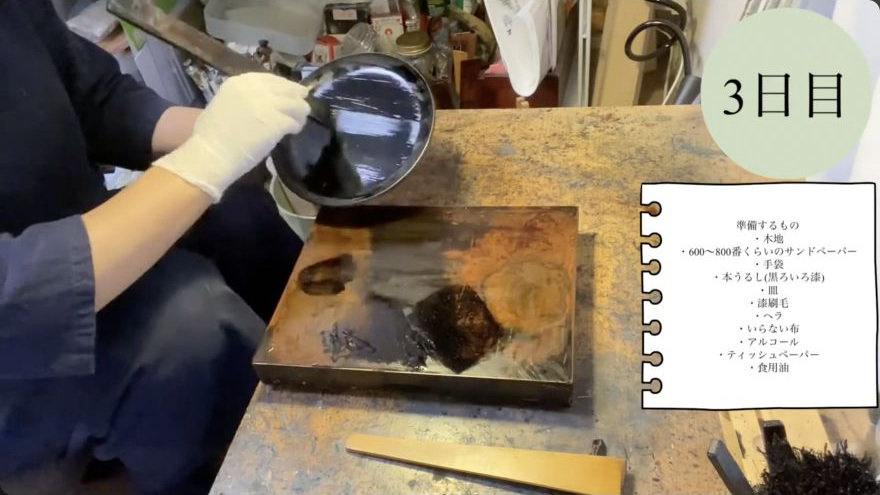
Dip the hake into the lacquer and load a moderate amount—enough to cover the surface without flooding. Begin at one edge and lay down small, overlapping dots of lacquer, then connect them by drawing the hake forward and back in long, even strokes. The motion is a gentle push-and-pull, not a scrub; the bristles should glide, not dig. Rotate the workpiece 90 degrees and apply in the perpendicular direction so that the two passes cross and the film thickness evens out. Work the edges last: rotate the piece and push the hake along the rim, spreading the lacquer already there without adding more, so that drips are smoothed rather than built up. The coat should be thin and continuous—visible as a wet, even sheen but not pooling or running. If a drip forms, smooth it immediately with the hake before it sets. For a plate or shallow vessel, coat the front face first, then the rim, keeping the same even pressure throughout.
When it is rightA single, unbroken film of lacquer covers the entire surface. Under raking light the coat is uniform in thickness; there are no bare patches, no runs, and no visible brush marks that would telegraph through the next coat.
When it goes wrongDrips, runs, or a coat that is visibly thicker in one area will cure with a ridge or a thin spot. If a run has not yet set, smooth it with the hake. If it has set, sand it flat with the appropriate grit, re-dust, and reapply. A coat that is too thin will not fully cover the ground and will show the texture beneath; add another coat rather than trying to build up a single thick one.
Workshop differences 2
On a ceramic repair the lacquer is applied as a deliberately thin coat over a sealed filler, and the maker warns to avoid it running onto the surrounding glaze; masking tape is used to protect the glaze edge.
For a white-lacquer plate the maker emphasises painting the front face only in one session and then the edges separately, keeping the technique identical in both passes.
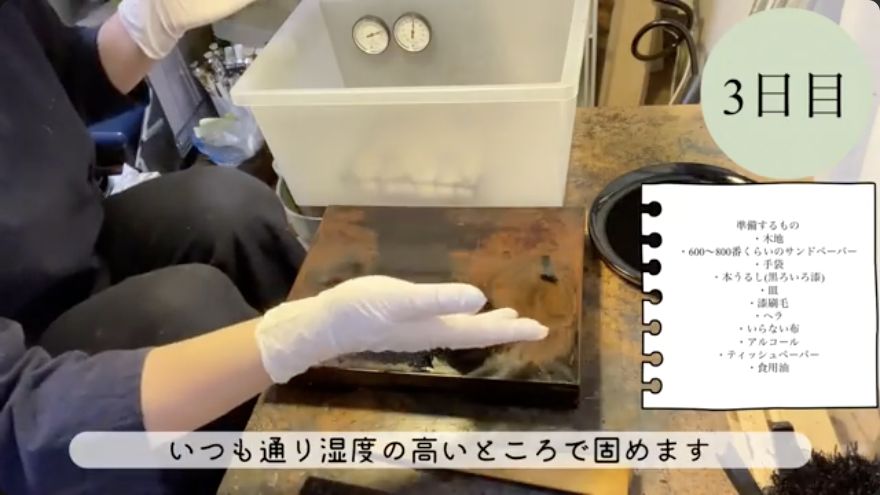
Place a damp towel in a shallow container and set a mesh rack or strainer on top so the workpiece sits above the water line. Lay the lacquered piece on the mesh, cover the container with a lid, and close it. The target is 70–80 % relative humidity; in a dedicated furo the cabinet is pre-conditioned to this range. Leave the piece undisturbed for two to three days. Check the surface periodically: if the lacquer wrinkles or forms a skin like the surface of set tofu, the humidity is too high—remove the lid briefly or let the towel dry slightly to lower the moisture. If the surface remains tacky after the expected time, extend the cure. The lacquer is ready for the next step when it is hard, does not stick to a fingertip, and feels solid under a light press of the nail.
When it is rightThe cured coat is hard, non-tacky, and shows a smooth, even surface with no wrinkles, blisters, or raised edges. It feels solid and slightly cool to the touch.
When it goes wrongWrinkling (tofu-skin) means the humidity was too high or the coat was too thick; sand the wrinkled area flat, re-dust, and reapply. A tacky or soft surface means the cure is incomplete; extend the time in the furo before proceeding. Curing in a dry environment causes the lacquer to remain soft and never fully harden.
Workshop differences 1
The Korean workshop (HwihoCraft) uses a chiljang (curing cabinet) maintained at high temperature and high humidity, with a typical cure of overnight to the next day; the maker stresses that the cabinet must be 'comfortable'—properly conditioned—before the piece is placed inside.
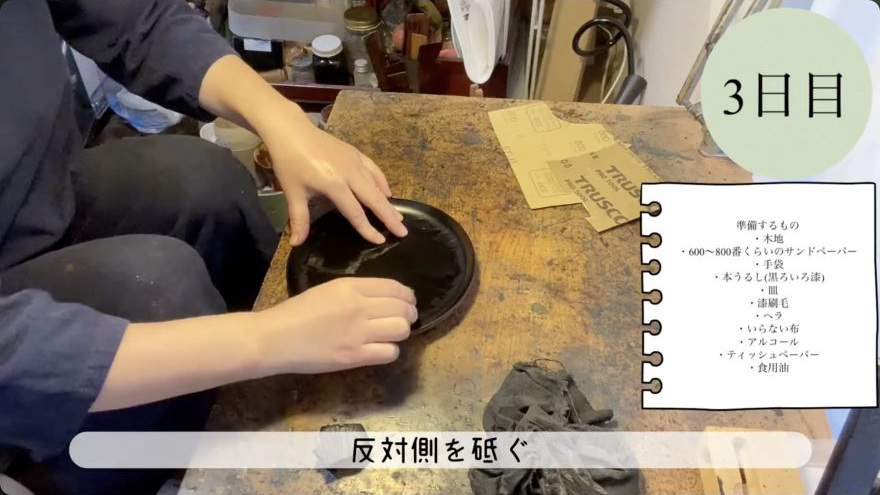
Once the coat is fully cured, wrap the appropriate grit sandpaper around the flat wooden block. For a wooden substrate use 600–800 grit wet sandpaper; for a ceramic or hard substrate use 1500 then 2000 grit dry film sandpaper. Abrade in one direction, wiping off residue after each pass, then rotate 90 degrees and abrade in the perpendicular direction. The goal is to flatten any minor ridges, brush marks, or thickness variations so the surface is optically flat. After sanding, wipe the surface with alcohol to remove any oil or slurry, blow away dust, and pick up remaining particles with a lacquer-tapped cloth or a clean dusting brush. The surface must be clean and flat before the next coat is applied.
When it is rightThe surface is flat and uniform under raking light. A fingertip dragged across it encounters no ridges or dips. No sanding residue or dust is visible.
When it goes wrongIf the surface is still uneven after sanding, the previous coat was too thick or had a defect; sand further until flat, then re-dust and reapply. Over-sanding can thin the lacquer layer or expose the ground beneath; if this happens, apply an additional coat to rebuild the film.
Workshop differences 1
The ceramic-repair workflow uses two grits in sequence (1500 then 2000) to progress from flattening to smoothing, while the wooden-substrate workflow uses a single wet-sanding pass at 600–800 grit because the wood is more forgiving and the goal is to key the surface rather than to polish it.
Naka-nuri is an iterative stage: the sequence of apply, cure, sand, and dust is repeated until the surface is optically uniform and the texture of the ground beneath is no longer visible. The number of coats depends on the project and the lacquer used; a plate may receive four or more middle coats, a repair may need two or three, and a vessel destined for mirror polishing may require several more. After each cycle, assess the surface under raking light: if you can still see the pattern of the ground, the cloth weave, or the filler beneath, another coat is needed. The final naka-nuri coat should leave a surface that is even in colour, free of texture, and ready for the uwa-nuri (final coat) or for the polishing sequence. There is no fixed number—stop when the surface reads as one continuous, uniform film.
When it is rightThe surface is a single, even tone with no visible layering, no ground texture showing through, and no variation in thickness detectable by touch or by raking light.
When it goes wrongIf the ground or filler is still visible after several coats, the coats may be too thin or the sanding between them may be removing too much lacquer. Increase the thickness of each coat slightly and reduce the aggressiveness of the between-coat sanding. If the surface is uneven, the application technique needs correction—check for consistent pressure and full coverage on each pass.
Workshop differences 1
The plate example in the Shōmon workshop is explicitly the fourth coat, implying at least three prior naka-nuri coats on that piece. The ceramic repair uses two to three middle coats of kuro-urushi. The range reflects the substrate and the depth of material that must be covered.
Immediately after finishing the coat, scrape the bulk of the lacquer from the hake bristles onto a plate using the hera. Wipe the plate and the hera with alcohol. Do not remove your gloves yet. Roughly wash the hake in white gasoline or kerosene on a plate to dissolve the remaining lacquer from the bristles. Then wash the hake in a small amount of cooking oil, working the oil through the bristles until the oil on the plate lightens in colour, indicating the lacquer is gone. Scrape the oil from the bristles with the hera, wipe the hake with a tissue, and let it dry. Store the hake with the bristles pointing up or in a holder so they do not bend. Repeat this cleaning after every use; hardened lacquer in the bristles will ruin the brush.
When it is rightThe hake bristles are clean, flexible, and free of lacquer residue. The oil on the cleaning plate is light in colour, confirming the lacquer has been removed. The brush is ready for storage or the next session.
When it goes wrongIf lacquer hardens in the bristles it will make them stiff and uneven, and the brush will no longer lay a smooth coat. Recovery: soak the hake in kerosene for an extended period and work the solvent through the bristles, but severe hardening may permanently damage the brush.
After the final naka-nuri coat has cured and been sanded flat, the surface is ready for the uwa-nuri (final coat) or, in a polishing sequence, for the first stage of togi (abrasive flattening) leading toward roiro (mirror finish). The piece should be stored in a stable, dust-free environment. If the next stage is not imminent, the surface can be left as-is for several weeks without damage, provided it is not exposed to direct sunlight, extreme dryness, or physical contact. Any dust that settles before the next coat must be removed by the same dusting procedure described in Step 1.
Terminology 10 terms
中塗naka-nuri
the middle coats, the series of lacquer layers between the ground and the final coat
刷毛hake
the lacquer brush used for applying coats
風呂furo
the humidity-controlled curing cabinet
黒漆kuro-urushi
black lacquer, the standard colour for naka-nuri on most projects
呂色漆roiro-urushi
polishing-grade black lacquer, used when the final surface will be polished to a mirror
上塗uwa-nuri
the final coat, applied after naka-nuri is complete
下地shitaji
the ground layers beneath the naka-nuri coats
研ぎtogi
flattening by abrasion between coats
木地kiji
the bare wooden substrate
髹漆kyūshitsu
the discipline of lacquer coating, the overall craft
The exact number of naka-nuri coats for a given project is not standardised across the sources; it appears to depend on the substrate, the depth of the ground, and the desired final finish. A reference table by project type (plate, bowl, repair, pen) would be useful.
The sources do not specify the exact viscosity or 'cut' of the lacquer used for naka-nuri. Whether the lacquer is used straight from the tube or thinned with a small amount of turpentine or additional urushi is not stated explicitly, though the Tamenuri Studio source mentions thinning for a differen
The transition from naka-nuri to the uwa-nuri or to the polishing sequence is not covered in these sources. The specific grit progression, the type of polishing compound, and the number of polishing passes are outside the scope of the material provided.
Sources and method notes 8 videos · 5 channels
3 of these 8 videos are cited by a step.
chimahaga↗ Kintsugi: Repairing an Antique Imari Plate with a Platinum Marufun Finish | Kintsugi Journal #4
松江藩御抱え塗師12代目 小島ゆり↗ Day 3: Brush painting and mirror polishing "Second layer of Kuroro-iro lacquer" (lacquer painting...
옻칠나전공방 휘호 / HwihoCraft↗ How to make Korean lacquer - Najeon Chilgi & Ottchil #2 Reviewed, but not cited by a step
Tamenuri Studio↗ How Do Urushi Pens Get So Glossy? - Uwazuri part 1 Reviewed, but not cited by a step
Kintsugi by Dmitry Bykov↗ Кинцуги видео уроки. Наращиваем недостающий фрагмент. Маска для шва Reviewed, but not cited by a step
松江藩御抱え塗師12代目 小島ゆり↗ Day6 刷毛塗り&鏡面磨き「ひたすら磨く」(初心者向けうるし塗り教室) Reviewed, but not cited by a step
Kintsugi by Dmitry Bykov↗ Кинцуги видео уроки. Чистка шва, снимаю маску, формирую носик Reviewed, but not cited by a step
Each illustration is a frame from a source video, checked against the step it accompanies. Steps without a verified frame link to the original source.
6 of 6 steps include a verified frame.
The method combines several workshop demonstrations; it is not a settled standard. 5 of the 8 videos listed are not cited by any step. See the 3 unanswered questions.