Urushi
Bowls · Pens · Furniture & Wood Objects
Welcome
Urushi (漆) is the sap of Toxicodendron vernicifluum and its relatives, refined and applied in dozens of thin layers to build a finish that is harder than most modern varnishes, food-safe once cured, naturally antibacterial, and — done well — genuinely beautiful. It is also slow, occasionally toxic to work with, and full of vocabulary and micro-techniques that took centuries to develop. This guide exists to compress everything a serious hobbyist needs — history, chemistry, tools, buying advice, and precise step-by-step technique for bowls, pens, and furniture — into one place, with a real source behind every claim.
This is a living, growing document assembled primarily from three kinds of sources: working studios who publish their process (above all Tamenuri Studio, run by Michal Kulka, whose blog is the single richest English-language technical resource on urushi available online), museum and academic conservation literature, and specialist suppliers and forums where practitioners troubleshoot in public. Where a technique has centuries of Japanese terminology behind it, that vocabulary is preserved and translated rather than flattened into generic "lacquering" language, because the terms map to real, distinct steps you need to be able to search for on your own later.
How to use this guide
Structure. Part I covers what urushi is and how to set up safely. Part II is a buying guide for every tool category. Part III is the technical core — the layering sequence (shitaji → naka-nuri → uwa-nuri) that underlies almost everything, plus the two showcase finishes, tamenuri and roiro. Part IV covers decorative techniques (maki-e, chinkin, raden). Part V applies all of it specifically to bowls, pens, and furniture. Part VI is reference material: a defect-diagnosis table, glossary, bibliography, and case studies of master craftsmen.
Sourcing. Every chapter ends with a "Sources" list. Inline links point to the original page. Where a fact could not be independently verified beyond a single source, that is noted rather than presented as settled.
Foundations
What Is Urushi? History, Botany, and Chemistry
Urushi is the purified, processed sap of Toxicodendron vernicifluum (formerly classified Rhus verniciflua), a tree in the same family as poison ivy and poison sumac. Related lacquer trees are tapped across East and Southeast Asia: Rhus succedanea in Vietnam yields a sap rich in laccol rather than urushiol, and Gluta usitata in Myanmar produces a thitsiol-based sap used for Burmese thayo lacquerware. All three cure by the same basic enzymatic mechanism, which is why "urushi," "sơn ta," and Burmese lacquer are technically cousins rather than the same material — a distinction that matters if you buy lacquer from a non-Japanese supplier expecting Japanese-grade urushiol content. (Guild LacArt, Asian Lacquer)
A very old material
Lacquer trees are documented growing in Japan as far back as roughly 12,600 years ago, in the incipient Jōmon period, and lacquered red-thread ornaments recovered from the Kakinoshima "B" site in Hokkaido have been dated to around 7000 BCE — among the oldest known lacquerwork anywhere. (Wikipedia, Japanese lacquerware) By the Heian period (794–1185) Japanese artisans had developed maki-e — drawing a design in wet lacquer and sprinkling metal powder onto it before polishing — a technique covered in depth in Part IV. Japanese lacquerware was exported throughout East and Southeast Asia and into India; Qing-dynasty China referred to it as "foreign lacquer" (yangqi), and the Yongzheng Emperor is recorded as having taken a particular interest in the craft. (Wikipedia, Japanese lacquerware)

How the sap is harvested
A lacquer tree isn't tapped until it is roughly 10–15 years old, and a single tree yields only about 200 grams of usable sap across an entire harvesting season (typically May through October), collected through repeated shallow cuts. (Guild LacArt) This scarcity — one reasonably sized bowl can require the seasonal output of a meaningful fraction of a tree once you account for waste, testing, and multiple coats — is the main reason good urushi is expensive and Japan now imports the majority of its raw sap from China, reserving domestic Japanese-grown urushi (notably from Jōboji in Iwate Prefecture) for high-end restoration and National Treasure work.
Why it hardens: the chemistry
Urushi does not dry by solvent evaporation the way most modern finishes do. It cures through oxidative enzymatic polymerization: an enzyme naturally present in the sap, laccase, catalyzes a reaction between urushiol molecules and atmospheric oxygen, cross-linking them into a dense polymer network. That's why urushi needs humidity to cure rather than dryness — the laccase enzyme requires water to stay active — and why it is typically cured in a humid box (muro or furo) rather than open air. (Kyuseido; Tamenuri Studio, Curing Urushi) Modern materials-science research continues to refine the picture: recent papers have modeled thermal curing kinetics to speed up the process (ScienceDirect, 2025), studied UV-induced polymerization as an alternative cure path (ScienceDirect), and examined how the degree of urushiol hydrogenation changes cured-film surface morphology. This is genuinely still an active research area, not settled 19th-century craft lore.
Why bother, instead of a modern finish?
Fully cured urushi is exceptionally hard and resists water, heat, alcohol, common solvents, acids, alkalis, and mold far better than oil or most film finishes. (Guild LacArt) It is food-safe once cured — cured urushiol is chemically inert and cured lacquerware is sold and used daily alongside plastic tableware in Japan. (Fine Woodworking, 2026) It's also repairable in a way plastic and most modern coatings aren't (see the kintsugi note in Part IV), and it ages instead of just degrading — many Edo-period lacquer pieces are still in daily-use condition centuries later. The tradeoffs are real: it is slow (weeks to months per finished piece, longer for showcase finishes), it is an occupational allergen, and it demands humidity control most home shops don't have by default. Chapters 2 and 4 cover both problems directly.
- Wikipedia — Japanese lacquerware
- Guild LacArt — Asian Lacquer
- Kyuseido — An In Depth Introduction to Urushi Lacquer Art
- Tamenuri Studio — Curing Urushi: concept, tips, Q&A
- Fine Woodworking — Using Urushi Lacquer in Your Home Shop (2026)
- ScienceDirect — Rapid and sustainable urushi coatings: thermal curing kinetics
- YouTube — The Art of Chinese Lacquer: Step-by-Step Making of Real Urushi
Safety First: Urushiol, Allergies, and Protective Practice
Why it's trickier than "just wear gloves"
Urushiol sensitization is cumulative and individual. Some people handle raw urushi for years with no reaction and then suddenly react badly; others react on first contact; a minority never react at all. Michal Kulka of Tamenuri Studio is explicit about this in his own beginner's account: he personally shows no reaction but still treats every session as if he could react tomorrow, with "gloves, long sleeves, and a strict 'don't touch your face, don't touch random things' workflow." (Tamenuri Studio, So you want to start with urushi?) Treat that as the baseline standard, not an exaggeration — sensitization tends to get worse, not better, with repeated exposure.
Baseline protective setup
- Gloves: nitrile, changed the moment they're contaminated or torn. Latex is not a reliable barrier for everyone.
- Long sleeves and ideally a dedicated apron or shop coat you don't wear elsewhere.
- No bare-hand contact with brushes, spatulas, mixing surfaces, or waste rags until they are confirmed clean or cured.
- A dust mask/respirator when sanding — cured urushi dust is not the allergen risk that liquid urushi is, but wood and mineral abrasive dust (tonoko, jinoko) still shouldn't be inhaled. (Fine Woodworking)
- Dedicated cleanup solvents: practitioners commonly use vegetable, olive, or plain cooking oil, or turpentine/alcohol, to strip uncured urushi from skin, brushes, and tools before a full soap wash. Salad oil in particular is recommended for cleaning brushes without damaging the bristles. (Tamenuri Studio; Suzanne Ross, Urushi FAQs)
If you do react
Wash the area with soap and cool water as soon as possible, avoid scratching (it spreads the oil and can cause secondary infection), and treat it as you would poison ivy — cool compresses, over-the-counter anti-itch treatment, and a doctor if it's severe, spreads to the face/eyes, or doesn't improve. Several craft-supply and kintsugi sites publish practical first-response guidance aimed specifically at urushi rather than generic poison-ivy advice, worth bookmarking before you start: Goenne's urushi allergy guide, Tamenuri Studio's rash article, PoJ Studio, "Am I Allergic to Urushi?", and Tsugu Tsugu's rash guide.
Food safety and cure time
Cured urushi is genuinely food-safe and reactions to fully cured pieces are extremely rare — cured lacquerware is everyday tableware across Japan. (Fine Woodworking) The catch is "fully cured": a piece can feel dry and handleable within days but not be chemically finished curing for much longer — practitioner guidance puts final handling readiness around 14 days and full hardening as long as a year for some layered work. (Suzanne Ross, Urushi FAQs) The standing rule from every source consulted here is the same: overestimate cure time, not underestimate it, especially for anything that will touch food or mouths (bowls, cups, pen sections).
- Wikipedia — Urushiol-induced contact dermatitis
- Tamenuri Studio — So, you want to start with urushi?
- Tamenuri Studio — Urushi rash
- Goenne — Urushi Allergy: Prevention, Symptoms, Treatment
- PoJ Studio — Am I Allergic to Urushi?
- Tsugu Tsugu — Urushi Rash
- Suzanne Ross — Urushi FAQs
- Fine Woodworking — Using Urushi Lacquer in Your Home Shop
Grades & Types of Urushi
Urushi is sold under a confusing number of names because it's classified along two independent axes at once: how refined it is, and how much oil has been blended in. Getting the vocabulary straight will save you from buying the wrong grade for the layer you're working on. (Tamenuri Studio, Types of urushi; Suzanne Ross, Urushi FAQs)

Raw lacquer (ki-urushi)
Crude sap that has only been filtered to remove bark and solids. Sold in grades depending on harvest timing and intended use:
| Grade | Typical use | Notes |
|---|---|---|
| Ki-urushi / Seshime | Base coats, putties (kokuso/sabi), intermediate layers, first practice coats | The cheap "workhorse" grade — start here. Autumn-harvest sap tends to be lower quality and is reserved for undercoats. (Tamenuri) |
| Kijōmi | Wiping coats, higher-end topwork | Marketed specifically for finishing/wiping applications. |
| Naka-nuri urushi | Middle coats | Summer-harvested, hand-stirred in vats to reduce water content and thicken it. (Suzanne Ross) |
Refined clear lacquer
Made by nayashi (mechanically stirring/homogenizing the sap into a uniform fine emulsion) and kurome (slow heating to reduce water content). This is where the well-known top-layer names come from:
| Name | Oil? | Typical use |
|---|---|---|
| Sugurome / Roiro clear | No oil | Backbone lacquer for roiro polishing workflows (see Chapter 20) |
| Kijiro | No oil | Clear, refined; tuned to show the wood grain through — the base of the tamenuri finish |
| Shu-ai | Oil-added | Nuri-tate / hana-nuri style finishing — glossy straight off the brush, no polishing pass |
| Nashiji | Oil-added, tinted with gamboge | Warm yellow ground for the nashiji sprinkled-gold effect (Chapter 28) |
| Hakushita | — | Formulated specifically for foil/leaf adhesion (gold, silver, tin) |
Black urushi (kuro-urushi)
Made by stirring iron compounds into refined lacquer during processing, which reacts with the tannins to produce a deep black. Available as a no-oil version for roiro polishing and an oil-added version for nuri-tate style work straight off the brush. (Tamenuri Studio)
Pigmented / colored urushi
Pigment dispersed into clear or lightly tinted urushi. Two hard rules recur across every source consulted: keep total pigment load under roughly 40% by weight (more weakens the cured film), and always filter pigmented urushi through fine yoshino-gami paper before use to strain out clumps and debris. (Tamenuri Studio) Not every pigment is chemically compatible with urushi — verify compatibility before committing a batch. (background)
Setting Up Your Workshop
Two pieces of infrastructure separate a workable urushi setup from a frustrating one: a clean, dust-free work surface, and a humidity-controlled curing space (muro or furo). Neither needs to be expensive to start.
The curing box (muro / furo)
Because urushi cures via a humidity-dependent enzyme reaction rather than evaporation (see Chapter 1), it needs to sit somewhere warm and humid immediately after coating. Beginners commonly build one from a plastic storage box with a damp sponge or wet towel inside to hold humidity, and small (~5 mm) vent holes — critical, because a fully airtight box that never exchanges air can actually be a mistake: laccase needs a steady trickle of oxygen too, not just moisture. (Tamenuri Studio, Curing Urushi; Tamenuri Studio, How to start) At the hobbyist end this can be as simple as a cardboard box with a cup of water inside, kept in a heated room — reportedly sufficient for small work. (Fine Woodworking, 2026) At the serious end, purpose-built temperature/humidity-controlled cabinets exist — one practitioner notes wryly that these are often the same cabinets marketed to reptile keepers for incubation. (Woodspirit Handcraft)
| Parameter | Target range | Notes |
|---|---|---|
| Relative humidity | 70–85% RH (up to 85–90% for the earliest tamenuri base coats) | Low RH stalls the cure entirely; swinging RH with temperature changes risks condensation defects |
| Temperature | 20–25°C (68–77°F) | Warmth speeds curing, but excess heat can "snap-set" the surface and trap brush marks while the layer beneath stays soft |
| Airflow | Small (~5mm) vents | Fully sealed boxes without air exchange can stall the reaction |
| Set time (touch-safe) | 6–12 hours | Full mechanical/sanding-ready cure takes days; full chemical cure can take weeks to roughly a year for heavy layered work |
(Sourced from Tamenuri Studio's curing guide, cross-checked against Suzanne Ross's FAQ, which independently gives a compatible 60–80% RH / 20–25°C range.)
Three build levels for a furo, from Tamenuri Studio
Michal Kulka's dedicated furo-building guide lays out three concrete tiers, useful as a literal shopping/building list depending on how serious you are:
| Level | Build | Good for |
|---|---|---|
| 1 — Minimal | Cardboard box with lid, wooden slats to keep the work off the wet floor, a water container, and a damp rag | Learning, basic fuki-urushi; impractical for frequent or advanced use |
| 2 — Moderate | An old wooden cupboard lined inside with cedar or cypress (the wood buffers humidity swings), removable shelving, a water tray plus damp cloth, a low-power heating mat, and a basic hygrometer | Regular practice, most hobbyist work |
| 3 — Advanced | A small, well-sealed plastic container, wood-lined, with a tight-fitting lid holding humidity drift to roughly ±1–2% overnight, and a quality sensor (budget hygrometers can be off by as much as ±10%, so treat cheap readings as a trend indicator, not an exact number) | Showcase finishes (tamenuri, roiro) where consistency matters most |
He also distinguishes three humidity stages rather than one fixed target — worth layering on top of the single-number targets given earlier in this chapter: shime-buro (wet, 70–85% RH, for fresh coats), a milder 60–70% RH phase for clarity and color in refined layers, and kara-buro (dry, 50–60% RH) for stabilizing a piece before final handling. For furniture-scale objects that won't fit any box, he notes professional workshops build large dual-chamber wooden furo with rotary shelving — worth knowing the term exists if you ever need to search for a furniture-scale build. (Tamenuri Studio, Furo — how to make a cabinet for curing urushi; see also Kintsugi Art's muro guide and megu.space's muro page for independent beginner builds.)
Work surface
A dedicated mixing/working surface matters more than people expect: a sheet of glass at least 30×20 cm set on a rubber mat gives you a flat, solvent-resistant, easy-to-clean palette for mixing pigments and working urushi with a spatula, and it can be scraped clean with a blade between sessions. (Tamenuri Studio)
Seasonal planning
If you live somewhere with real seasons and no climate-controlled curing box, working in summer is simply easier — ambient humidity and warmth in temperate climates tend to sit inside or close to the target range without much intervention, which is one reason Fine Woodworking's home-shop guide recommends summer for a first attempt at fuki-urushi. (Fine Woodworking) A dedicated humidity box removes the seasonal dependency entirely and is worth building before your second project.
- Step-by-step methods — compiled from workshop videos, each step sourced and timestamped
- Tamenuri Studio — Urushi-furo: how to cure urushi (video)
- Tamenuri Studio — Curing Urushi: concept, tips, Q&A
- Tamenuri Studio — How to start with urushi?
- Suzanne Ross — Urushi FAQs
- Woodspirit Handcraft — Urushi Lacquer
- Fine Woodworking — Using Urushi Lacquer in Your Home Shop
Gear & Buying Guides
Brushes
Traditional Japanese lacquer brushes (hake) are built from bundled human hair set in a wooden handle — a specialist craft in its own right (Tokyo's Edo Hake is a designated traditional craft). They hold an enormous amount of lacquer and lay it down with very little brush-mark, but they're expensive, need real skill to use well, and are overkill for a first project.
Michal Kulka's account of getting started is unusually candid on this point: he tested roughly 30 different brushes and found that cheap synthetic brushes sometimes outperformed expensive artist-grade ones, and that he personally struggled to get good results from a traditional hake early on. (Tamenuri Studio) His practical beginner recommendation: several synthetic-fiber artist brushes, 6–14 mm wide, at roughly $3–10 each, rather than investing in hake immediately. (Tamenuri Studio)
| Brush | Best for | Where seen |
|---|---|---|
| Synthetic artist brushes, 6–14mm | Learning, small work (pens, boxes), fuki-urushi | ~$3–10 each; Tamenuri Studio |
| Ashirai brush | General urushi application, kintsugi-scale work | ~$9.90; Chimahaga |
| Hake brush set (3) | Broader coats once your control is good | PoJ Studio |
| Traditional human-hair hake | Professional-scale nuri (top-coating) work | Specialist Japanese suppliers; see Chapter 10 |
Brush care
Clean brushes in salad/vegetable oil before a final soap wash — this lifts uncured urushi out of the bristles without the harshness of straight solvent, which can damage natural bristle over time. (Suzanne Ross) A dedicated resin brush-cleaning basin is sold specifically for this in maki-e tool sets (see Chapter 9).
Spatulas & Mixing Tools
The spatula (hera) is where urushi is actually mixed with pigment, clay, or filler and where putties like kokuso and sabi (Chapter 13) are worked into cracks and joints. Professional kits distinguish several shapes by task:
| Tool | Use | Typical price |
|---|---|---|
| Chisya-hera | General maki-e / fine application spatula | From ¥888 |
| Momiji-hera | Small decorative/detail spatula | From ¥252 |
| Plastic spatulas (various hardness) | General mixing, filling; hardness chosen per task | ¥204–¥396 |
| Rubber spatulas | Flexible scraping/mixing | From ¥888 |
| Hera-gi (spatula stand) | Keeps loaded spatulas clean between uses | From ¥5,400 |
| Nushiya knife | Specialist cutting/scraping | From ¥16,400 |
| Wooden hand palette | Mixing surface held in hand | ¥1,800 |
| Hinoki & bamboo spatula | Traditional repair/kintsugi-style mixing | See Kintsugi Art |
(Prices from Urushi Tsutsumi's maki-e tools catalog.) For a first project, one or two plastic spatulas of different hardness plus a wooden or plastic mixing spatula is enough — see the beginner materials list in Tamenuri Studio's guide, and pair it with the glass work surface described in Chapter 4.
Abrasives
Urushi work is, by volume, mostly sanding. Between-coat leveling, ground-layer flattening, and final polishing each call for a different abrasive:
| Abrasive | Stage | Notes |
|---|---|---|
| Sandpaper, 320–3000 grit (wet/dry) | Between-coat leveling, shitaji flattening | Beginner range recommended by Tamenuri Studio |
| Micromesh, 1800–12000 | Final pre-polish smoothing | Same source; used after conventional grits are exhausted |
| Tonoko (fine clay powder) | Final polishing / migaki stage | Traditional finishing abrasive, used damp with a soft pad or the palm |
| Jinoko (coarser clay/stone powder) | Ground-layer (shitaji) building | Mixed into raw urushi as filler-abrasive base, see Chapter 15 |
320-grit is also cited as a sensible stopping point for the underlying wood surface itself before the first coat goes on — hand-tool-finished surfaces are preferred over heavily machine-sanded ones because urushi telegraphs surface texture rather than hiding it. (Fine Woodworking)
Filtering & Storage
Raw and pigmented urushi both need to be strained before use to remove skin, clumped pigment, and debris that would otherwise show up as grit in the finish.
- Yoshino-gami paper — traditional fine straining paper. Pigmented urushi should always be pushed through it before application. (Tamenuri Studio)
- Uma / urushi-koshiki — a dedicated straining rig that holds the filter paper under pressure as urushi is worked through it by hand. (~¥12,480, Urushi Tsutsumi)
- Storage — keep unused urushi in small, airtight, opaque containers; only decant what you need for a session, since repeated air exposure of a large stock degrades it faster than using it from small sealed portions.
Maki-e Tool Kit
Decorative maki-e work (fully covered in Part IV) uses its own dedicated tool set, mostly built around handling and applying metal powders precisely:
| Tool | Purpose | Price |
|---|---|---|
| Aluminum funzutsu (powder cylinder) | Sprinkling metal powder onto wet lacquer | From ¥1,080 |
| Bamboo funzutsu | Same, traditional material | From ¥3,120 |
| Hunsaji powder scoop | Measuring/transferring powder | ¥3,360 |
| Hunchin weight (brass) | Anchors paper/design template while working | ¥1,380–¥1,800 |
| Okimegami paper | Design transfer / work surface (79×109cm sheet) | ¥60 |
| Floss silk | Polishing and finishing fine work | From ¥840 |
| Resin brush-cleaning tool | Rinsing maki-e brushes | ¥2,700 |
(Full catalog and pricing: Urushi Tsutsumi.) A separate set of gold/silver/tin metal powders in graded particle sizes is needed alongside these tools — covered with technique in Chapter 23.
Supplier Directory
Sourcing is one of the biggest practical obstacles outside Japan. Michal Kulka's own account describes spending roughly a year researching before working with uncured urushi, with supplies initially "scattered" and mostly sourced from Japan. (Tamenuri Studio) Below is a working list assembled from studios and suppliers that publish English-language storefronts or shipping information.
| Supplier | Region | What they carry |
|---|---|---|
| Watanabe Shoten | Japan, ships internationally | Full range of raw and refined urushi grades, traditional tools |
| Dictum | Germany / EU | Urushi and general fine-woodworking finishing supplies, English storefront |
| Urushi Tsutsumi | Japan, ships internationally | Maki-e tools, spatulas, powders (see Ch. 6 & 9) |
| Chimahaga | International storefront | Small quantities (5g) of raw/pigmented/black urushi — good for a first purchase |
| PoJ Studio | International | Brushes, kintsugi/urushi starter supplies |
| Kintsugi Studio | International | Tool sets oriented to kintsugi but overlapping with general urushi tooling |
| Goenne | International | Standard and hypoallergenic urushi, kintsugi supply kits |
| Nosaku (Kanazawa) | Japan | Small-quantity urushi in varying cure speeds; recommended for beginners by Suzanne Ross |
| Nakaya | Japan | Finished urushi fountain pens (not raw supplies) — see Chapter 31 |
Lower-cost alternatives (and why they aren't the same material)
Two products commonly come up as cheaper substitutes, and both are worth knowing about but neither is true urushi:
- Cashew lacquer — a synthetic finish derived from cashew nutshell liquid, sold in Japan as a lower-cost, lower-allergy alternative that approximates the look of urushi. Available at ordinary Japanese hardware stores; export/shipping of it internationally has historically been complicated by regulation. (Penturners forum)
- Washin synthetic urushi — a modern synthetic finish sold in beginner-friendly kits (~$60) that cures faster than true urushi; often used for practice base coats before switching to real urushi for top layers. (Penturners forum)
Both are legitimate tools in their own right, but if you're aiming for authentic technique (and a finish that ages the way historic pieces do), treat them as practice/underlayer materials rather than replacements for real urushi in your top coats.
PPE Buying Guide
None of this needs to be exotic — it's the same category of gear as any allergen-handling shop task, chosen deliberately rather than improvised. Revisit Chapter 2 for the reasoning; this is the shopping list.
| Item | Why |
|---|---|
| Nitrile gloves (box, not a pair) | Changed often — contaminated gloves are a transfer risk, not a barrier |
| Long-sleeve shop coat or dedicated apron | Keeps urushi off street clothes and skin at the wrist/forearm |
| Particulate dust mask / respirator | For sanding sessions — wood dust and mineral abrasive dust, not urushiol vapor specifically |
| Barrier cream (optional, supplementary) | Extra margin on exposed skin; not a substitute for gloves |
| Vegetable/olive/salad oil | First-pass cleanup of uncured urushi from skin, tools, and brushes before soap |
| Turpentine or alcohol | Tool and surface cleanup |
| Dedicated waste bag/container | Contaminated rags and gloves shouldn't go in general household trash uncontained |
Core Techniques
Wood & Substrate Prep
Urushi has been applied to almost anything — bamboo, woven fabric, paper, leather, ceramics, even metal armor plate — but wood remains the classic substrate, and the choice of species is not incidental. Conservation literature on Japanese lacquer identifies the common historical substrates as hinoki (Japanese cypress), elm, and quince, with fabric, paper, leather, and ceramic used for smaller or specialty objects. (Conservation Wiki, Lacquer) Wajima-nuri, one of Japan's most prestigious lacquerware traditions, is built specifically on "delicate zelkova [keyaki] wooden substrates" — a dense, fine-grained hardwood chosen for its dimensional stability under the repeated wetting/humidity cycles that urushi curing demands. (Wikipedia, Wajima-nuri)
Kiji-gatame: stabilizing the wood before any coat goes on
Before the first ground layer, the raw wooden object (kiji) goes through kiji-gatame — "wood hardening/fixing." Any imperfections, knots, or small gaps are filled with kokuso (raw lacquer, rice glue, and zelkova wood meal — full recipe in Chapter 13), and then the whole piece is saturated with a thin coat of raw lacquer specifically to stabilize the wood and reduce warping as it moves through repeated humid curing cycles. The surface is then polished — traditionally with sharkskin boards, or sandpaper for a modern equivalent — to key the surface for the ground layers that follow. (Japan Artisan Foundation, Shitaji-nuri)
Kokuso & Sabi: Filling, Reinforcement, and Repair Paste
Two putties do almost all of the structural filling work in urushi craft, and they are not interchangeable — kokuso is coarse and structural, sabi is fine and cosmetic/final-fill. Both also happen to be the working vocabulary of kintsugi ceramic repair, since kintsugi is essentially urushi substrate technique applied to broken pottery instead of wood. (JAANUS, kokuso-urushi)
Kokuso — for gaps, chips, and joint reinforcement
| Component | Role |
|---|---|
| Mugi-urushi (flour + water + raw urushi) | Binding base |
| Wood powder (fine sawdust) | Bulk aggregate, any fine wood works |
| Polishing powder (fine ground rock) | Structural filler |
- Mix the three components; the source recipe does not give a fixed ratio — work to a stiff, moldable paste.
- Apply in thin passes of only 0.5–1 mm at a time with a bamboo spatula, wiping the spatula frequently on tissue as material sticks to it.
- Let each pass dry at least overnight before adding the next. This is not optional: a kokuso layer applied too thick traps air and the interior never fully cures.
- Build up until the fill sits level with — or very slightly below — the surrounding surface.
- Only after the fill is complete, sand flat with 320-grit paper. Don't sand between kokuso layers.
- Leftover kokuso keeps about a week rolled into a ball, wrapped in plastic film, stored cool and dark.
(Full process: Tsugu Tsugu, Filling the Deep Chips with Kokuso)
Sabi — for small holes and final surface leveling
- Put fine polishing powder (traditionally whetstone-cutting waste) on a mixing palette.
- Add water a few drops at a time with a dropper, kneading with a spatula until it reaches the consistency of hard mayonnaise.
- Add raw urushi equal to roughly 60% of that paste's volume, and knead quickly.
- Work fast — sabi-urushi begins hardening as soon as it's exposed to air. Keep it covered with a spatula "lid" between uses.
- Apply with a bamboo or specially-shaped spatula. On glass, unglazed ceramic, or other surfaces you don't want stained, mask everything except the repair area with tape first.
- If applying with a brush rather than a spatula, work quickly and wash the brush tip in oil immediately after — sabi hardens onto brush hair fast.
(Full process: Tsugu Tsugu, Filling Small Holes with Sabi-Urushi; see also the general overview at kintsugiblog and megu.space.)

Nunokise: Cloth Reinforcement
Nuno-kise ("clothing/dressing with cloth") reinforces exactly the parts of a wooden object most likely to crack under the stress of repeated humid curing and daily use: joints, rims, edges, and any thin or structurally weak section. Linen or cotton cloth is laid onto these areas using kisemono-urushi, a raw-lacquer-and-rice-glue adhesive mix, essentially laminating a fabric layer into the substrate itself before any ground coat goes on. (Japan Artisan Foundation)
- Cut cloth to cover the target area with some overlap.
- Bed it into a coat of kisemono-urushi (raw urushi + rice glue), pressing out air bubbles and wrinkles.
- Where cloth pieces overlap, shave the overlap down flat once tacky/dry so no ridge remains.
- Cover the reinforced area with somi-urushi — raw urushi mixed with rice glue and carbonized zelkova wood powder — to bury the cloth texture.
- Dry-polish the area flat before moving on to the ground-layer (shitaji) stage.
This step is why well-made rims on Wajima-nuri and similar high-grade lacquerware survive decades of daily chipping risk that would split an unreinforced rim outright. It's directly relevant to bowl rims and pen sections/caps — see Chapter 30 and Chapter 31.
Shitaji: Ground Layers
Once the substrate is stabilized and reinforced, the shitaji (ground) is built up in progressively finer coats — the structural foundation everything else sits on. Wajima's version, ji-nuri, is a three-pass sequence:
| Pass | Name | Mix |
|---|---|---|
| 1 | Ippen-jizuke | Raw lacquer + rice glue + coarser earth powder (jinoko) |
| 2 | Nihen-jizuke | Same components, less rice glue, finer earth powder |
| 3 | Sanpen-jizuke | Least rice glue, finest earth powder — for adhesion and hardness |
Each pass is dry-polished flat before the next goes on. Wajima's signature material here is jinoko — a diatomaceous earth unique to the region, whose microscopic pores let lacquer penetrate the particle itself rather than just coat it, which is a large part of why Wajima-nuri has a reputation for exceptional durability. (Japan Artisan Foundation)
Grade tiers you'll see referenced elsewhere
Conservation literature on Japanese lacquer generally describes a hierarchy of ground recipes by cost/quality, useful for recognizing what you're looking at (or buying):
| Tier | Recipe |
|---|---|
| Premium | Fairly pure urushi + tonoko (powdered earthenware) → sabi, a grey paste |
| Mid | Nikawa — animal glue based, reddish-brown, cheaper |
| Economy | Rice paste + powdered earthenware |
| Modern/cheapest | PVC-based ground (not traditional, conservation-flagged as lowest grade) |
Naka-nuri: Middle Coats
With the ground built and flattened, middle coats bridge the rough structural ji-nuri layers and the refined top coat. Naka-nuri urushi is a specific grade for this stage: summer-harvested sap that's been hand-stirred in vats to reduce water content and thicken it for these first pure (unfilled) coats. (Suzanne Ross, Urushi FAQs) Conservation surveys of historical Japanese lacquerware note that the overall build from ground to finished surface commonly runs to more than 20 thin coats, each cured first at high humidity and then finished off in ambient air before the next goes on. (Conservation Wiki)
A concrete, documented middle-coat cycle, from a maker producing urushi fountain pens: black naka-nuri urushi brushed on and cured in a humidity chamber for 48 hours, then ground flat with charcoal and water — and that whole cycle repeated five times before moving to finer coats. (On Fountain Pens, guest post) That single documented example is worth internalizing: five full 48-hour cure-and-level cycles, for the middle stage alone, on an object the size of a pen barrel. Scale expectations accordingly for a bowl or tabletop.
Uwa-nuri / Nuritate: Top Coating
The top coat is where grade selection matters most (see Chapter 3). Oil-added shu-ai urushi is formulated for nuri-tate (also called hana-nuri) style finishing — glossy directly off the brush, with no polishing pass required afterward. This is the faster, more forgiving route to a finished glossy surface, and it's what most everyday lacquerware (bowls, trays) uses rather than the far more labor-intensive roiro route covered in Chapter 20.
Uwazuri: more than "polishing"
Tamenuri Studio makes a point of clarifying that uwazuri — the finishing stage often glossed in English simply as "polishing" — is doing something more specific than that word implies: it's a distinct refinement stage that determines the final glossiness at a near-microscopic level, shaped by how many coats were laid, how the surface was prepped before the final coats, and the curing conditions during those final passes — not just by how much you rub it at the end. Traditional abrasive powders used here include migakiko and dozuriko, alongside modern equivalents. (Tamenuri Studio, Uwazuri)
Fuki-urushi: The Wipe-On Technique
If tamenuri and roiro are the showcase finishes, fuki-urushi ("rubbed-down urushi") is the practical everyday one — and the best realistic starting point for a first project, since it needs the least specialized equipment and is applied much like a hand-rubbed oil finish. Fine Woodworking's 2026 home-shop guide lays out the full beginner process:
- Prepare the wood surface with hand tools where possible, stopping sanding at 320-grit — urushi shows surface texture rather than hiding it, so overly fine machine-sanded surfaces don't necessarily help.
- Apply raw urushi (jō-ki urushi) with a folded cotton cloth, rubbing it evenly across the surface until it begins to thicken/tack up.
- Buff thoroughly with a clean cloth to remove all excess — this is not a build coat, it's a wipe-and-remove coat.
- Cure in a controlled environment: a proper muro, or for small work, a cardboard box with a cup of water inside a heated room.
- Allow 7–10 days for full curing before recoating.
- Light 320-grit sanding between coats is optional, not mandatory.
- Apply 4–5 total coats.
Ideal conditions: 70–80°F (21–27°C), 75–85% relative humidity — summer, in most temperate climates, is the easy season to attempt this. (Fine Woodworking, 2026) The same wipe-on approach and cure targets are independently corroborated for turned bowls specifically by Woodspirit Handcraft, which describes wiping seshime-grade urushi thin, then curing 75–85% RH / 70–80°F for a minimum of three days between each of 3–5 coats — meaning the full process for one piece runs several weeks. (Woodspirit Handcraft)
Tamenuri Deep Dive
Tamenuri is a translucent layered finish — typically a colored or black under-layer glimpsed through several coats of clear kijiro urushi — and it's the technique that gives Tamenuri Studio its name and its signature look on fountain pens. It's a genuinely advanced finish; Michal Kulka's own beginner guide frames it as the technique to work toward, not start with, and lays out the full sequence in detail:
- Base layers: 2–3 wiped ki-urushi coats at 85–90% humidity.
- Naka-nuri layers: 1–4 coats at 80% humidity.
- Optional pigmented naka-nuri base coat — this is what will show through the translucent layers above, so color choice here defines the finished look.
- Kijiro with pigment: 4–5 layers at 60–70% humidity, with extended curing time between them.
- Clear kijiro overlay: 1–3 ultra-thin layers at 60–65% humidity — this is what creates the translucent depth effect over the pigmented layers beneath.
- Uwazuri polishing sequence: 4–5 progressively-less-diluted kijōmi applications (see Chapter 17 for what uwazuri actually does).
- Final polish with migaki powder after a 48–72 hour cure.
(Tamenuri Studio, How to start with urushi?) Note the humidity is deliberately stepped down as the work progresses from base to final layers — high humidity for the bulk early coats, progressively drier and more controlled for the thin final layers where surface quality matters most.
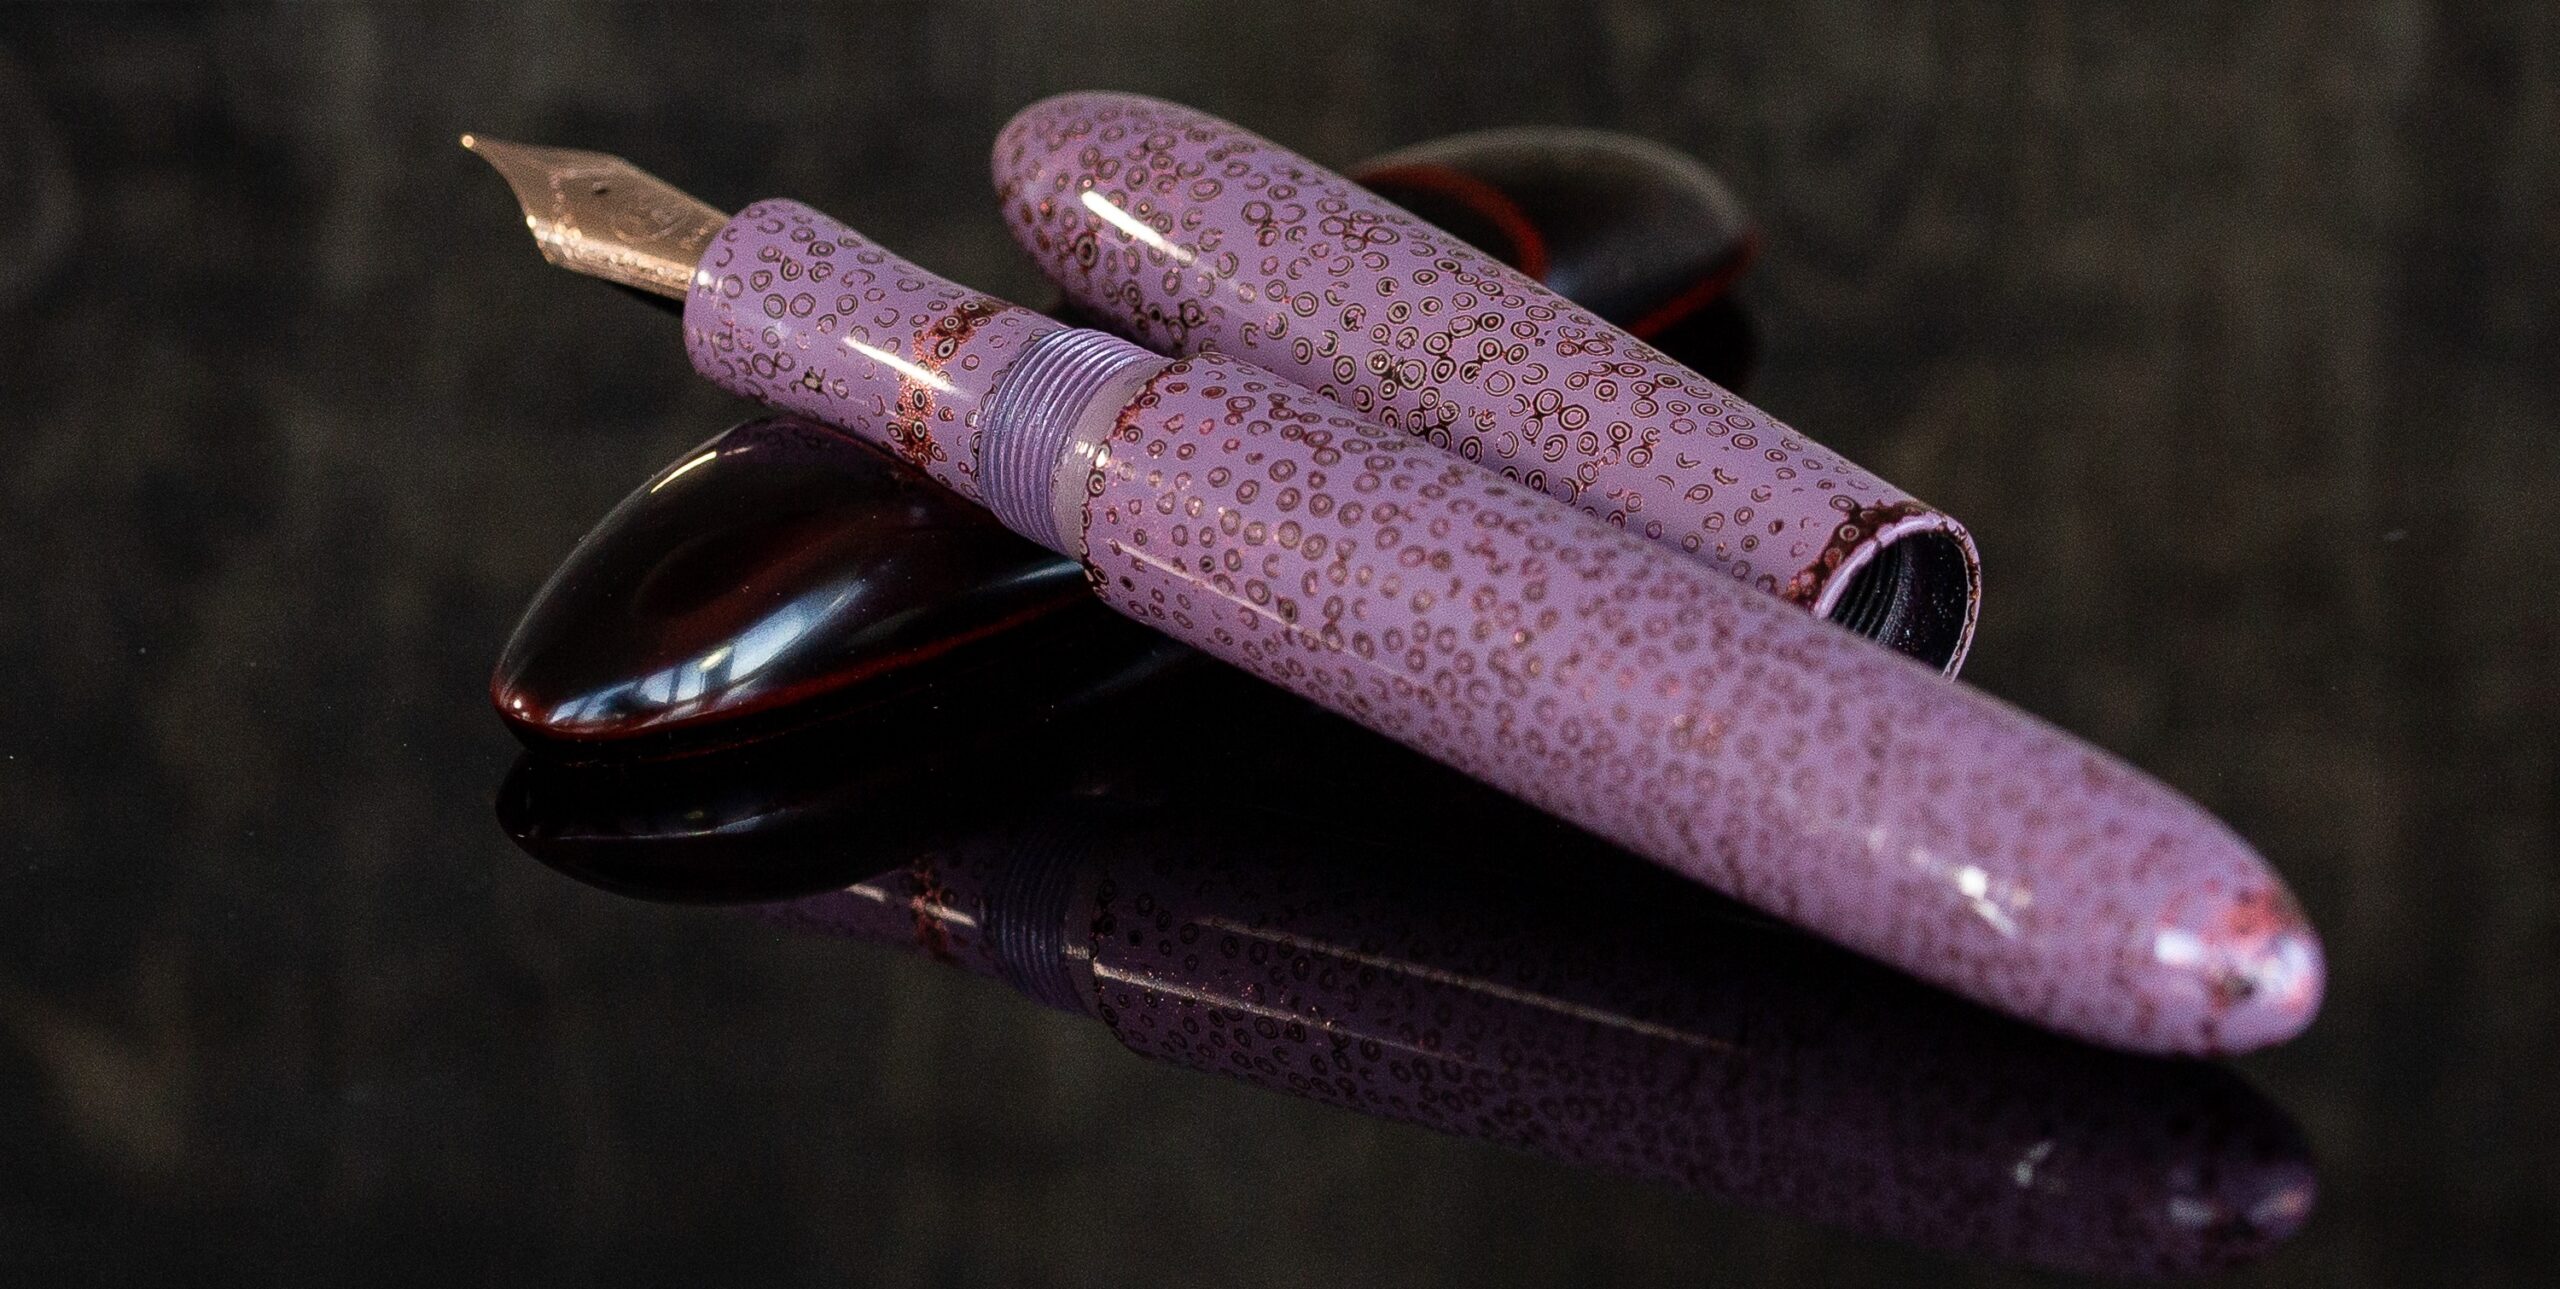
A related decorative variant, nanako-nuri ("fish-roe pattern"), is a Tsugaru-region (Aomori) technique from roughly the 17th–18th century that Tamenuri Studio has documented on video — but the studio is explicit that it assumes prior competence in roiro, layered pigmented urushi, and controlled curing; it is not a beginner technique.
Roiro-nuri & Roiro-migaki: The Polished Mirror Finish
Roiro is the other showcase route — the deep, glassy, almost wet-looking black (or colored) mirror finish seen on the finest lacquerware and pen bodies (Danitrio's "roiro-migaki" pen line is a well-known commercial example). Unlike nuri-tate/hana-nuri (Chapter 17), it is not glossy off the brush — the shine is built entirely afterward, by hand, through polishing. The Wajima tradition documents it as a four-stage process:
| Stage | What happens |
|---|---|
| 1. Roiro polishing (dozuri) | Wet-sand the cured lacquer surface with fine charcoal (traditionally Suruga charcoal), then work in oil-based polishing powder with cloth |
| 2. Wiping | Remove excess oil/polishing residue with a wet cloth, then a dry cloth, and store the piece |
| 3. Suriurushi | Coat the polished surface with a very thin layer of premium raw lacquer, wipe with soft cloth, cure in the drying chamber (nushiburo) |
| 4. Tsuya-age ("bringing up the shine") | Lightly rub the surface with oil-soaked cotton, then work in deer-horn powder or fine titanium powder with the fingertips |
Stages 3–4 are repeated multiple times to build the final mirror gloss — the craftsman's bare hands, not a mechanical buffer, are the actual polishing tool, since hand pressure and feedback are what avoid microscopic scratching on a surface this reflective. (Japan Artisan Foundation, Roiro)
A fully worked, documented example: 19 steps on a pen
The most concrete public account of a complete shitaji-through-roiro sequence, measured in actual steps and days, comes from a maker producing urushi fountain pens on ebonite blanks:
- Two coats of raw seshime urushi directly on ebonite (kiji-gatame equivalent).
- Black naka-nuri urushi, brushed, cured 48 hours in a humidity chamber, charcoal-flattened — repeated five times (Chapter 16).
- High-quality kuro-roiro urushi applied, cured 24 hours, ground flat with charcoal and water — repeated twice.
- Multiple polishing passes alternating: charcoal-and-water sanding; tonoko-and-oil polishing paste; thin coats of clear kijōmi urushi with careful wiping and drying; and finally micro-polishing with rapeseed oil and migako powder worked in by fingertip, palm, or deer skin.
Total: a minimum of 19 distinct working steps, each separated by 1–5 days of cure time, in a furo held at 25–28°C and 65–80% humidity. (On Fountain Pens, guest post) That is a useful number to hold onto: it's the real, sourced step-count for a small object done properly, and it's the benchmark against which "quick" tutorials should be judged.
Curing Science & Troubleshooting
Revisit Chapter 1 for the underlying chemistry — laccase-catalyzed oxidative polymerization — and Chapter 4 for the target environment. This chapter is about what to do when a coat isn't curing right.
Diagnostic order
Tamenuri Studio's curing guide recommends troubleshooting a non-curing or badly-cured coat in a specific order, from most to least likely cause: relative humidity → temperature → oxygen exchange → condition of the urushi itself → film thickness. (Tamenuri Studio)
- Too dry: the cure simply stalls — laccase needs ambient moisture to stay active.
- Humidity swinging with temperature: risks condensation forming on the surface, which shows up as clouding or surface defects.
- Too hot: can "snap-set" the surface — skinning it over while the layer underneath stays soft — trapping brush marks and creating a hard-on-top, soft-below gradient that will show up later as wrinkling or unevenness when sanded.
- Sealed box with no air exchange: counterintuitively can stall curing — laccase needs a small, steady oxygen supply, not just humidity, which is why curing boxes should have small (~5mm) vents rather than being fully airtight.
- Too thick: urushi cures best in thin, controlled coats — a thick application risks skinning over at the surface while staying uncured underneath, the same failure mode as excess heat.
Testing without guessing
Progress from least to most invasive contact: breath test (watch how condensed breath beads or sheets on the surface) → light glove touch → thumbnail press in an inconspicuous spot → small test-sand area. Distinguish "set" (surface no longer tacky, safe to handle carefully) from "fully cured" (mechanically stable, sandable without gumming up your paper) — set can happen overnight under good conditions, full cure takes anywhere from days to, for heavily layered showcase work, the better part of a year. (Tamenuri Studio; corroborated by Suzanne Ross's independently-sourced 60–80% RH / 20–25°C figures.)
For a symptom-by-symptom defect table (fisheyes, blushing, wrinkling, and their fixes), see Chapter 34.
Sanding & Polishing Progression
Pulling together the abrasives from Chapter 7 into an actual sequence, from raw wood to mirror gloss:
- Wood surface: hand tools where possible, stop at 320-grit before the first coat. (Fine Woodworking)
- Ground/shitaji layers: dry-polished flat after each of the three ji-nuri passes (Chapter 15).
- Between naka-nuri coats: charcoal-and-water flattening, or 320–600 grit wet sandpaper. (Chapter 16, On Fountain Pens)
- Pre-topcoat smoothing: progressing through 600–3000 grit wet/dry, then micromesh 1800–12000. (Tamenuri Studio)
- Roiro polishing stage: fine charcoal (dozuri), then oil-based polishing powder, alternating with thin suriurushi coats (Chapter 20).
- Final gloss: tonoko or migakiko powder worked by hand, finished with rapeseed/vegetable oil and deer-horn powder or fine titanium powder on the fingertips or palm — genuinely hand-polished, not machine-buffed, at this stage.
Every transition in this list is a real cure-and-inspect cycle, not a quick pass — which is the entire reason a finished roiro piece represents weeks to months of elapsed time even though the hands-on labor is comparatively modest.
Decoration
Hira Maki-e: Flat Sprinkled Gold
Maki-e — "sprinkled picture" — is Japan's signature lacquer decoration technique: a design drawn in wet lacquer, then dusted with fine metal powder that bonds to the tacky surface as it cures. Hira maki-e ("flat") is the base version, where the design sits level with (or barely above) the surrounding lacquer once finished. (Musubi Kiln, Guide to Maki-e Part 1)
The process
- Okime-egaki: the design is drawn/traced on the back of a sheet of paper.
- Okime-tori: that design is transferred onto the lacquered object via a stencil, laid down as lacquer brush strokes on the base surface.
- Drawing: the motif is painted directly in lacquer (often a reddish bengara-tinted lacquer for visibility while working).
- Maki (sprinkling): while the lacquer is still tacky, metal powder is sprinkled on through a bamboo funzutsu tube (see Chapter 9) so it bonds only to the wet design, not the surrounding cured surface.
- Sealing & polishing: once cured, a thin sealing coat locks the powder in place, and the surface is sanded/polished back to reveal and burnish the metal design flush with the surrounding field.
A documented commercial account of this cycle (Namiki/Pilot's maki-e pen workshop) describes it as four repeated stages — lacquering, drawing, sprinkling, polishing — with a complete high-end piece requiring the cycle "as much as 130 times" and more than three months of elapsed working time. (Pen Boutique, Namiki lacquering artistry)
Gold powder grades (kindei)
| Powder | Character |
|---|---|
| Marufun (丸粉) | Made from pure gold bar; thicker, rounder particles, higher luster |
| Hiramefun (平目粉) | Flatter/finer particles than marufun |
| Keshifun (消し粉) | Made from gold leaf; very fine; common on Buddhist altar fittings |
| Hirameji (平目地) | Sown-and-ground hiramefun, often paired with taka maki-e for dimensional texture |
| Hyomon (平文) | Not a powder — cut metal sheet affixed directly to the lacquer surface |
(Shizendo, Maki-e: gold powders)


- Musubi Kiln — Guide to Maki-e Part 1: Types, Materials & Techniques
- Musubi Kiln — Guide to Maki-e Part 2: Production Process
- Pen Boutique — Maki-e, Chinkin, and More: Namiki's Lacquering Artistry
- Shizendo — Maki-e: A Japanese Lacquerware with Various Kinds of Gold Powders
- Kyuseido — An In Depth Introduction to Urushi Lacquer Art
Togidashi Maki-e: Burnished Gold
Togidashi maki-e ("polished-out sprinkled picture") is the oldest maki-e style, and technically the most involved: instead of sealing and polishing just the design, the entire surface is coated in black, oil-free roiro-urushi over the sprinkled design, fully burying it — and the design is then ground back into visibility.
- Design painted in lacquer; gold or silver powder sprinkled over it while wet.
- A protective coat seals the powder once cured.
- The entire object is coated in black, oil-free roiro-urushi, burying the design completely.
- Aratogi ("first grinding"): the surface is burnished with damp charcoal, gradually and carefully re-exposing the gold powder beneath the black overcoat.
- Finishing: repeated thin coats of raw lacquer (suri-urushi) applied with cotton, each polished back with crumpled rice paper, then charcoal burnishing, then a final gentle polish with granular charcoal.
The result is a soft, slightly hazy, dimensionally subtle design that sits flush with the surrounding black field rather than sitting visibly on top of it — structurally different from hira maki-e even though both use sprinkled powder. The earliest known example is on a Nara-period (645–794) sword scabbard; the technique matured through the Heian period and, in the Muromachi period, was combined with raised relief to create shishiai togidashi maki-e. (Britannica, Togidashi maki-e)
Taka Maki-e: Raised Gold Relief
Taka maki-e ("raised sprinkled picture") builds an actual three-dimensional foundation under the design before any gold goes on, so the finished motif stands proud of the surface in true relief rather than reading as a flat, flush image. Industry sources are consistent that this is the most demanding maki-e variant — Pen Boutique's account of Namiki's workshop practice calls it flatly "the most difficult and demanding form of maki-e," requiring master-level skill to execute. (Pen Boutique)
The dimensional buildup is commonly paired with hirameji — sown-and-ground hiramefun gold powder — specifically because that combination produces a thicker, more textured, more three-dimensional surface than either technique alone. (Shizendo) Beyond that structural principle, exact underlayer recipes (clay/charcoal-loaded lacquer pastes used to build the relief mound before powder is applied) vary by workshop and were not fully documented in the sources reviewed for this guide — treat taka maki-e as a technique to study under direct instruction or from a dedicated maki-e manual (see the bibliography) rather than attempt from a written summary alone.
Chinkin: Engraved Gold-Line Lacquer
Chinkin ("sunken gold") is structurally the opposite of maki-e: instead of building a design up on the surface, the design is carved into the cured lacquer with specialized chisels — fine dots and lines gouged directly into the finish — and gold or silver dust or leaf is then worked into the incisions, where it catches and holds. (Pen Boutique) It is unforgiving in a way few other decorative techniques are: because the design is physically cut into the lacquer surface, a mistake cannot be painted over or corrected — the artisan has to restart. In the Wajima-nuri tradition specifically, chinkin decoration is documented as having been introduced during the Kyōhō era (mid-Edo period), predating the region's adoption of maki-e in the later Bunsei era. (Wikipedia, Wajima-nuri)

Raden: Mother-of-Pearl Inlay
Raden (螺鈿) inlays cut, thinned shell — most often abalone or other iridescent mother-of-pearl — into the lacquer surface for a shimmer and color-shift that no pigment or metal powder can reproduce. It's an old technique with a long transmission history: it's traced to roughly 1700 BCE in ancient China, reached Tang-dynasty China (618–907 CE) via Persia's Sassanian Empire, and arrived in Japan through Nara-period diplomatic envoys returning from Tang China — surviving examples are preserved among the Shōsōin treasures. (Musubi Kiln, The Intricate Artistry of Raden)
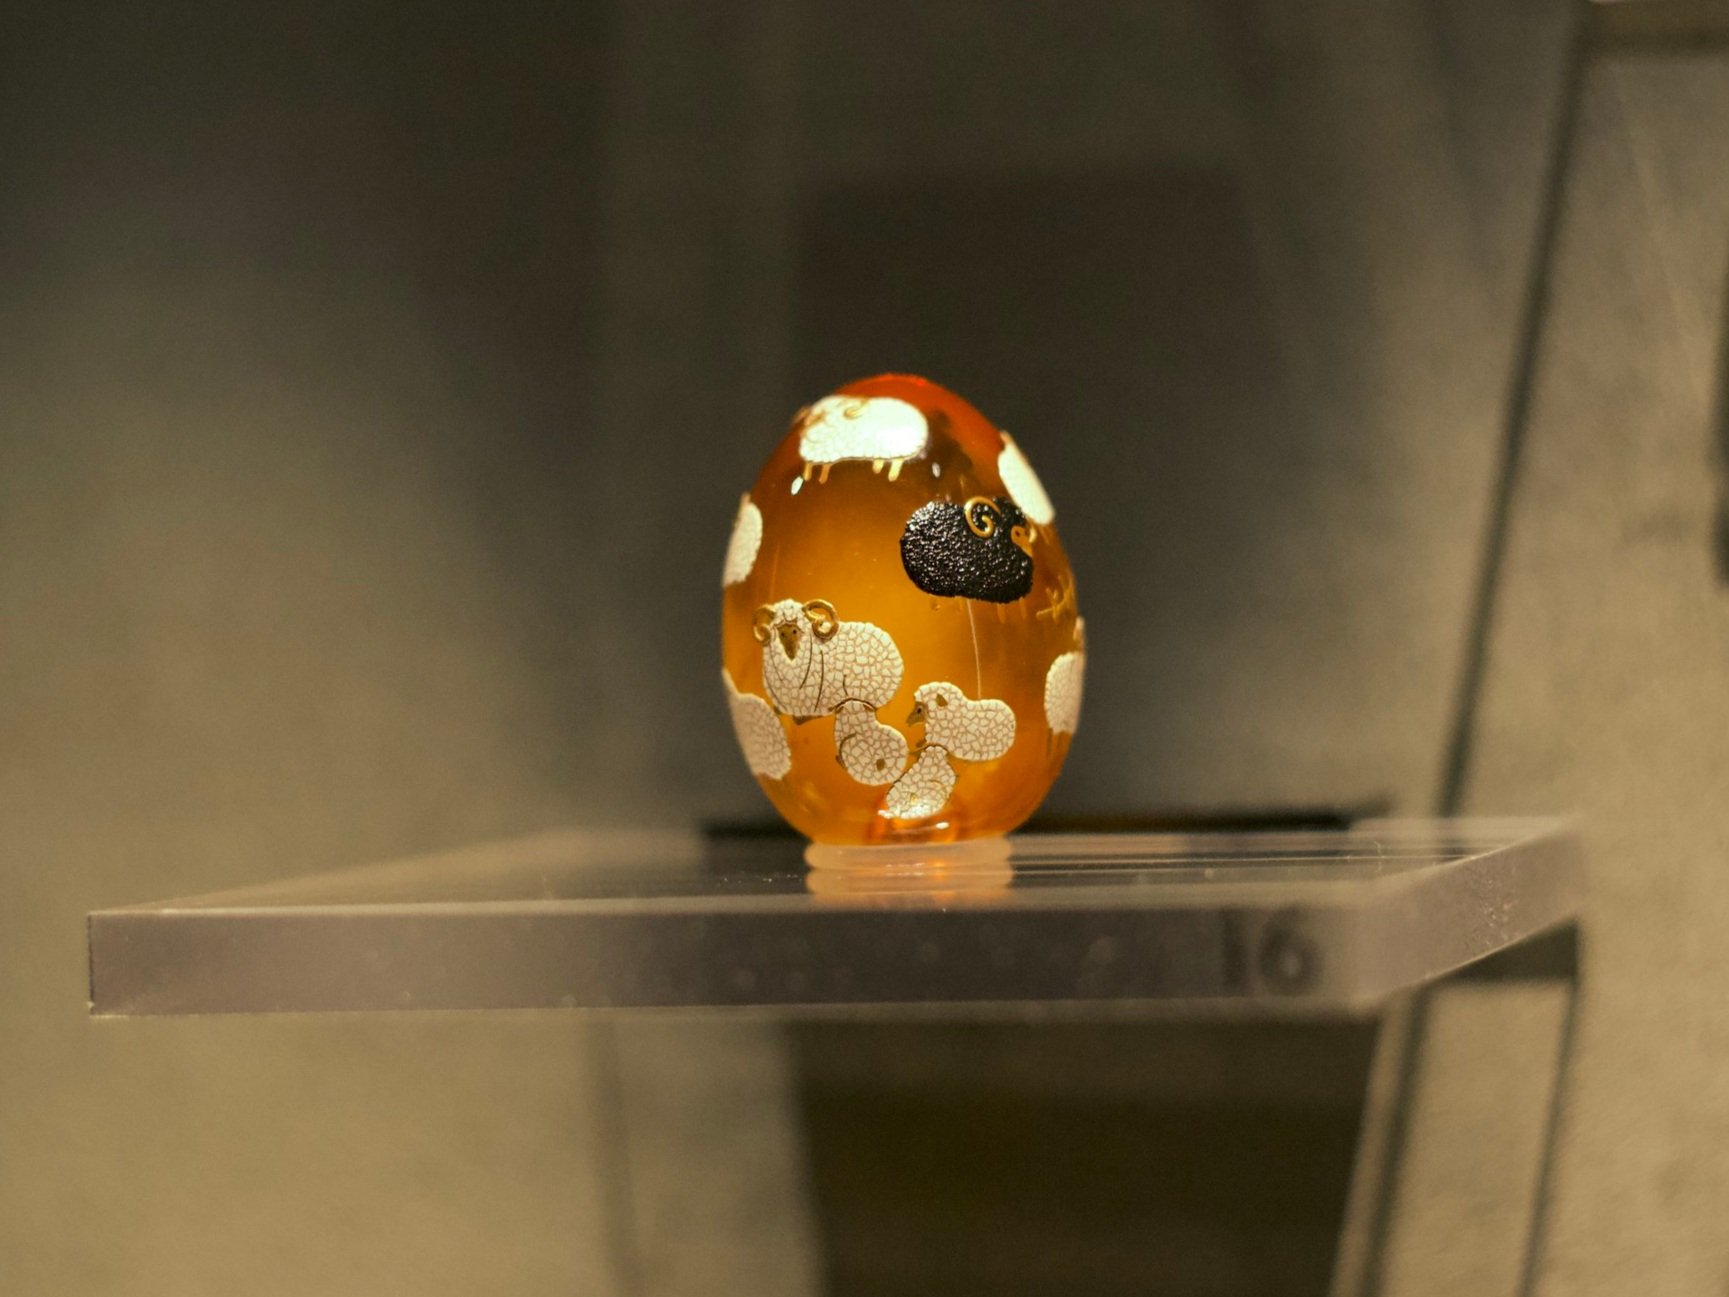
In practice, thin sheets or fragments of shell are cut to the design's shape and set into the lacquer ground, then generally overcoated and polished back — similar in spirit to togidashi maki-e's bury-and-reveal logic — so the inlay sits flush with the surrounding surface rather than proud of it. A closely related technique, rankaku (eggshell inlay), uses small fragments of quail eggshell the same way, bonded to the lacquer, overcoated, and burnished back to reveal a cracked-mosaic pattern. (Pen Boutique)

For further reading on shell selection and cutting in more depth: Britannica, Raden; Kogei Standard, Mother-of-Pearl Inlay; Urushi Stefos, Raden.
Nashiji & Pigmented/Kawari-nuri Effects
Nashiji ("pear-skin ground")
Nashiji sprinkles a thin gold powder shaped like hiramefun across the surface, then covers it with repeated coats of transparent lacquer rather than opaque black — so the powder stays visible beneath a warm, glowing, semi-transparent field instead of being buried and re-exposed. The clear lacquer used for the ground is traditionally tinted with gamboge for a warm yellow cast (see Chapter 3). (Shizendo)

Kawari-nuri ("variant lacquer")
Kawari-nuri is an umbrella term for a family of textural and patterned surface effects achieved by deliberately manipulating how layers cure and interact — distinct from tamenuri (Chapter 19), though related in spirit. This guide has not been able to source a verified step-by-step for a specific kawari-nuri recipe; the standard technical reference is Jyussei Practice: Kawari-nuri (ISBN 4-88536-551-1), listed in Chapter 36's bibliography.

Kintsugi vs. Decorative Urushi: A Context Note
You will run into kintsugi suppliers and tutorials constantly while researching urushi technique — this guide cites several of them directly, because kintsugi retailers currently publish the clearest, most precise public recipes for kokuso and sabi (Chapter 13) available in English. It's worth being explicit about the relationship: kintsugi is not a different material or a beginner's version of urushi — it's the same urushi vocabulary and the same core techniques (kokuso and sabi filling, maki-e gold dusting) applied specifically to repairing broken ceramics along a visible seam, rather than to finishing or decorating an intact wooden object. Everything in Chapter 13 and much of Chapter 23 is directly transferable in both directions.

This guide's scope is deliberately new-object finishing and decoration for bowls, pens, and furniture rather than ceramic repair — but if a bowl you've made ever chips, you already have the vocabulary to fix it.
Object-Specific Application
Bowls
Turned wooden bowls are the classic urushi vessel, and fuki-urushi (Chapter 18) is by far the most common technique applied to them — it shows off the wood grain rather than hiding it, which is usually the point of turning a bowl from good timber in the first place. Yukiko Hachiya, a Yamagata Prefecture craftsperson unusual for personally handling both the turning and the lacquering of her bowls (most workshops split these into separate specialties), deliberately chose fukiurushi over decorative gold/silver work specifically because, in her words, she "realized the depth of the technique" — and her bowls are made explicitly for everyday domestic use, not display. (Nihonmono, Yukiko Hachiya)
A complete fuki-urushi sequence for a bowl
Tamenuri Studio's dedicated fuki-urushi article gives the fullest public step-by-step available in English — more detailed than the summary in Chapter 18, worth following closely for a bowl specifically:
- Wood prep: sand progressively through the grits without skipping steps — smoother surfaces darken less under the lacquer. Finish with a wet microfiber wipe to remove all dust before any urushi touches the wood.
- First coat, diluted: mix raw urushi (seshime or ki-urushi) with turpentine 1:1. Apply with a cotton wool tampon or brush, work it in quickly, let it penetrate, then wipe off all excess. Cure 24+ hours at roughly 70–75% RH, 20°C.
- Sand between coats: wet-sand #600–#1000 once cured — this is where most of the total work-time on a fuki-urushi piece actually goes.
- Optional pore filling: for open-grained woods, a thin sabi-urushi mix (tonoko clay : water : urushi ≈ 5:1:5) applied with a spatula, cured 48–72 hours, fills large pores before continuing.
- Optional pigmentation: pigmented urushi at this stage highlights the grain rather than hiding it; oil-soluble dyes allow layered color effects.
- Second coat, less diluted: around 20% turpentine, adjusted to the wood's absorption; apply and wipe the same way as the first coat.
- Build coats: 5 or more further undiluted urushi layers, sanding (#1200) only if a defect shows up — not routinely between every coat at this stage.
- Final polish: progress through wet sandpaper #1200–#3000, then a polishing paste mixed with rapeseed oil. For showcase pieces, a premium uwazuri-grade urushi (isehaya) coat, cured, then hand-polished with migakiko powder and minimal oil.
Cross-checked against Woodspirit Handcraft's independently sourced bowl process: seshime urushi wiped thin, cured a minimum of three days between each of 3–5 coats at 75–85% RH / 70–80°F — meaning the total elapsed time for one bowl typically runs several weeks even at the low end. (Woodspirit Handcraft)
Bowl-specific practicalities
- Coat inside and outside together. Bowls are thin-walled and prone to warping if one face dries/cures differently than the other — the same wood-stabilization logic as Chapter 12's kiji-gatame stage applies at the whole-piece level here.
- End grain (the rim and foot, on most turned forms) absorbs unevenly compared to face grain and often needs an extra diluted coat or two to seal properly before it matches the rest of the piece.
- Food safety is non-negotiable for the interior. Revisit Chapter 2: overestimate cure time before this bowl touches food, not underestimate it.
Pens
Fountain pens are where most Western hobbyists actually encounter urushi first — Nakaya, Danitrio, and Namiki/Pilot all sell urushi-finished pens commercially, and Tamenuri Studio itself is a pen-focused studio. Pens are also, despite their small size, not an easier starting object than a bowl: their cylindrical form, narrow tolerances (a coating that's a fraction of a millimeter too thick will bind the cap or section), and small threaded/functional parts make them fussier in different ways.
The documented 19-step sequence
Chapter 20 covers this in the context of roiro polishing; the same sequence, viewed as a pen-specific workflow:
- Two coats of raw seshime urushi directly onto the ebonite blank.
- Five repetitions of: black naka-nuri urushi, brushed, 48-hour humidity-chamber cure, charcoal-flattened.
- Two repetitions of: kuro-roiro urushi, 24-hour cure, charcoal-and-water ground flat.
- A long alternating polishing phase: charcoal/water sanding, tonoko-and-oil polishing paste, thin kijōmi coats with careful wipe/dry, and final micro-polishing with rapeseed oil and migako powder by fingertip.
19 steps minimum, 1–5 days of cure between each, in a furo held at 25–28°C / 65–80% RH. (On Fountain Pens)
Practical pen-specific notes
- Mask functional parts. Threads, the section-to-barrel fit, and the nib/feed housing need to stay free of buildup, or the pen simply won't assemble or write correctly — mask before every coat, not just the final one.
- Ebonite vs. wood blanks behave differently: ebonite doesn't absorb the way wood does, so the very first coats function more like a bonding/key layer than a soak-in coat — expect the process to diverge from the bowl workflow in Chapter 30 at exactly this early stage.
- Commercial naming conventions are worth learning to read: Danitrio, for instance, labels finishes directly by technique and color — "Roiro-migaki Black," "Roiro-migaki Red," "Kama-nuri Red Roiro-migaki" — which is a useful, very concrete vocabulary check against everything in Chapter 20. (Product examples: 1, 2, 3.)
- Manufacturer transparency is limited. Nakaya's own site confirms every pen is "carefully finished by a urushi lacquer craftsman" combining "the craftsman's skills with Nakaya's know-how," but — consistent with craft workshops generally — does not publish exact steps or timings. (Nakaya) Treat maker sites as inspiration and provenance, not technical documentation; the documented process above and the community forums below are where the real detail lives.
For community troubleshooting from hobbyists actually doing this on pen blanks (cost reality, brush choices, sourcing headaches), see the fpgeeks "Urushi on fountain pens" thread and the International Association of Penturners thread referenced in Chapter 10.
Furniture & Panels
Furniture-scale urushi work runs into the same chemistry and the same technique vocabulary as bowls and pens — but everything about logistics changes: curing boxes, wood movement, and even the polishing pass have to scale to something the size of a tabletop or a chest of drawers.
Wood selection at furniture scale
Two well-documented Japanese lacquered-furniture traditions agree closely on species: Iwayado tansu (Iwate Prefecture) uses zelkova (keyaki) — trees roughly 300 years old, logged and then air-dried for years before cutting, specifically to prevent warping and cracking once built — alongside paulownia and Japanese chestnut for secondary parts. (Kogei Japan, Iwayado Chests) Sendai tansu draws on the same zelkova-forward palette plus chestnut, cedar, and paulownia, prizing zelkova specifically because its grain stays visible through the finished lacquer. (Google Arts & Culture, Sendai Tansu)
Kijiro-nuri: the furniture-scale finish
Both traditions use kijiro-nuri — the same clear, grain-revealing grade discussed in Chapter 3 — applied and refined over many cycles:
- Bare wood smoothed with a whetstone.
- Lacquer mixed with polishing powder applied over the whole surface.
- Left to dry, then smoothed again.
- Repeat: raw lacquer applied, magnolia charcoal polish, repeated smear-and-polish cycles until the surface texture fully flattens.
- Kijiro lacquer applied as a distinct bottom, middle, and top coat sequence, each dried and smoothed in turn.
(Kogei Japan) A genuinely striking property of this specific finish, confirmed independently by the same source: kijiro-urushi becomes more transparent as it ages, meaning the wood grain underneath actually emerges and intensifies over years and decades of use rather than fading — the opposite aging behavior of almost every modern film finish.
Metal fittings, if your piece has them
Traditional tansu ironwork is its own craft, worth knowing about if you're building anything with hardware: designs are pasted onto iron or copper plate, hand-engraved by hammering chisels from the reverse side (repoussé), embossed, then the fittings are cut, filed, finished — Sendai tansu craftspeople work from a kit of roughly 1,300 specialized chisels and hammers for this. (Google Arts & Culture; Kogei Japan)
Scaling up: curing and layer count
Contemporary designers working in urushi at furniture scale confirm the same environmental targets used throughout this guide translate directly — 75–80% RH, ~24°C — but note the achievable layer count in a professional/design context runs to 15–16 coats for a piece like Aldo Bakker's "Urushi Series" furniture, applying fuki-urushi in roughly 15 repeated cycles to build a deep black, grain-revealing gloss. Notably, this contemporary work sometimes moves urushi onto entirely non-traditional substrates — rigid polyurethane foam, polystyrene, alongside pine — a reminder that urushi's chemistry doesn't actually require wood, just a stable, well-prepared substrate. The same source is candid about the real bottleneck at this scale: skilled non-Japanese urushi artisans remain rare, so most contemporary furniture designers collaborate directly with trained Japanese craftspeople rather than executing the finish themselves. (Architonic, Susanne Fritz on Urushi in Modern Design)
For the curing box itself, revisit Chapter 4: Tamenuri Studio's furo guide notes that professional operations scale up to large, dual-chamber wooden furo with rotary shelving for exactly this reason — a plastic tote stops being viable well before you reach tabletop size. If you're improvising at home, the honest answer is that this guide could not find a fully documented, safety-checked DIY method for tenting or humidifying a whole room-scale curing space, beyond the general principle (stable 70–85% RH, 20–25°C, gentle air exchange, no direct sun or drafts) — treat a first furniture piece as a reason to either build toward Tamenuri Studio's "Level 3" cabinet at the largest practical size, or work in sections/panels that do fit an existing furo before final assembly.
Boxes & Small Objects
Boxes — incense boxes (kōgō), writing boxes (suzuribako), tiered picnic boxes (jūbako), stationery stands — sit technically between pens and bowls: small enough to fit a modest furo, but with corners, hinges, and lids that behave like miniature furniture joints. Two things matter most here that don't come up as forcefully with a simple turned form:
- Corners and hinge lines are stress concentrators, exactly like the joints and edges discussed in Chapter 14 — nunokise cloth reinforcement is proportionally more important on a box than on a bowl, because a box has far more edges relative to its surface area.
- Lids are the classic maki-e canvas. Historical lacquerware collections are dominated by decorated box lids for exactly this reason — a flat, prominent, low-wear surface is the ideal ground for the gold-sprinkling techniques in Part IV. Documented museum examples include Edo/Meiji-period incense-set boxes decorated with plum and bamboo motifs and tiered stands referencing classical literature (The Tale of Genji). (Wikipedia, Japanese lacquerware)
Beyond those two points, the build sequence is identical to everything already covered: substrate prep (Ch. 12) → kokuso/sabi and nunokise at joints and corners (Ch. 13–14) → shitaji ground (Ch. 15) → naka-nuri and uwa-nuri (Ch. 16–17) → your choice of fuki-urushi, tamenuri, or roiro finish (Ch. 18–20) → optional maki-e/chinkin/raden decoration on the lid or lid interior (Part IV).
Reference
Defect Diagnosis Table
Symptom-first, drawing primarily on Tamenuri Studio's diagnostic ordering from Chapter 21 (RH → temperature → oxygen → urushi condition → film thickness), plus general finishing-defect knowledge flagged separately where it's not urushi-specific.
| Symptom | Likely cause | Fix |
|---|---|---|
| Surface still tacky after 24+ hours | Humidity too low, or urushi/laccase activity has degraded (old stock, poor storage) | Check and raise RH toward 70–85% first; if that doesn't resolve it within a normal cycle, suspect the urushi itself (see Ch. 8 on storage) and test a fresh batch |
| Wrinkled, alligatored surface texture | Cured too hot, or applied too thick — surface "snap-set" while the layer underneath stayed soft | Lower cure temperature toward 20–25°C; apply thinner coats; let each fully set before recoating (Ch. 21) |
| Cloudy, hazy, or blushed patches | Condensation formed on the surface from a humidity/temperature swing during cure | Stabilize the curing box against ambient temperature swings; avoid opening the box repeatedly during a cure cycle |
| Small circular craters or crawling ("fisheye") | Contamination on the substrate — oil, silicone, wax, or skin oils from bare-hand contact — repelling the lacquer as it's applied. (This is general film-finish behavior, not urushi-specific — flagged as adapted general knowledge, not a source found written about urushi directly.) | Clean the surface thoroughly with a urushi-safe solvent before coating; always wear gloves per Ch. 2, which also removes this risk at the source |
| Coat won't cure at all, stays liquid/gummy for days | Sealed curing box with no air exchange, starving the laccase reaction of oxygen — or RH far outside range | Add small (~5mm) vents to the curing box; recheck RH against the 70–85% target (Ch. 4, Ch. 21) |
| Grit or specks embedded in a pigmented coat | Pigment not filtered before application | Always strain pigmented urushi through yoshino-gami paper before use (Ch. 3) |
| Kokuso/sabi filler stayed soft or spongy inside | Applied too thick in one pass, trapping air and moisture inside | Rework in 0.5–1mm passes with a full overnight cure between each (Ch. 13) |
| Warping or cracking at a joint or rim | Insufficient moisture stabilization or missing cloth reinforcement at a stress point | Address at the substrate stage next time — kiji-gatame saturation (Ch. 12) and nunokise at joints/rims (Ch. 14) are prevention, not repair; existing cracks need kokuso fill |
Bilingual Glossary
Every Japanese technical term used in this guide, in one place, with the chapter where it's explained in context.
| Term | Meaning | See |
|---|---|---|
| Urushi (漆) | Japanese lacquer; the sap of Toxicodendron vernicifluum, refined | Ch.1 |
| Urushiol | The allergenic phenolic compound in raw urushi | Ch.2 |
| Laccase | The enzyme that catalyzes urushi's oxidative cure | Ch.1 |
| Ki-urushi | Raw, minimally filtered lacquer sap | Ch.3 |
| Seshime | Workhorse raw-lacquer grade for base coats/putties | Ch.3 |
| Kijōmi | Refined grade for wiping/finishing coats | Ch.3 |
| Naka-nuri urushi | Middle-coat grade, thickened by stirring | Ch.16 |
| Kijiro | Clear refined lacquer that shows the wood grain | Ch.3 |
| Sugurome / Roiro clear | No-oil refined lacquer, backbone of roiro work | Ch.3 |
| Shu-ai | Oil-added lacquer for nuri-tate/hana-nuri finishing | Ch.17 |
| Nashiji | Gamboge-tinted clear lacquer; also the sprinkled-gold-under-clear effect | Ch.28 |
| Hakushita | Lacquer formulated for foil/leaf adhesion | Ch.3 |
| Kuro-urushi | Black lacquer (iron-compound reacted) | Ch.3 |
| Kiji / Kiji-gatame | The raw wood object / the wood-stabilizing prep stage | Ch.12 |
| Kokuso | Coarse structural filler paste (flour + raw urushi + wood powder + rock powder) | Ch.13 |
| Sabi(-urushi) | Fine leveling/repair paste (polishing powder + water + raw urushi) | Ch.13 |
| Nuno-kise | Cloth reinforcement of joints/edges | Ch.14 |
| Kisemono-urushi | Raw urushi + rice glue adhesive used to bed reinforcement cloth | Ch.14 |
| Somi-urushi | Raw urushi + rice glue + carbonized zelkova powder, used over nunokise | Ch.14 |
| Shitaji / Ji-nuri | Ground layer(s) / the three-pass ground-building sequence | Ch.15 |
| Ippen-, Nihen-, Sanpen-jizuke | First, second, third ground-layer passes | Ch.15 |
| Jinoko | Porous diatomaceous earth powder used in Wajima ground layers | Ch.15 |
| Tonoko | Fine clay/earthenware powder used in polishing pastes | Ch.7 |
| Nikawa | Animal-glue-based ground material | Ch.15 |
| Uwa-nuri | Top coating | Ch.17 |
| Nuri-tate / Hana-nuri | Glossy-off-the-brush top coat style, no polish pass | Ch.17 |
| Uwazuri | Fine surface-refinement stage, more than simple "polishing" | Ch.17 |
| Migakiko / Dozuriko | Traditional polishing powders | Ch.17, Ch.20 |
| Fuki-urushi (suri-urushi) | Wipe-on-wipe-off application technique | Ch.18 |
| Tamenuri | Translucent layered finish over a pigmented ground | Ch.19 |
| Nanako-nuri | "Fish-roe" patterned Tsugaru regional technique | Ch.19 |
| Roiro(-nuri) / Roiro-migaki | Polished mirror-black finish / the finish plus its polishing process | Ch.20 |
| Dozuri | Charcoal-and-oil-powder polishing stage of roiro | Ch.20 |
| Suriurushi | Very thin coat of premium raw lacquer wiped on during roiro/finishing | Ch.20 |
| Tsuya-age | "Bringing up the shine" — final hand-polishing stage | Ch.20 |
| Muro / Furo | Humidity-controlled curing cabinet | Ch.4 |
| Shime-buro / Kara-buro | Wet curing stage (70–85% RH) / dry stabilizing stage (50–60% RH) | Ch.4 |
| Hera | Spatula | Ch.6 |
| Hake | Traditional human-hair lacquer brush | Ch.5 |
| Yoshino-gami | Fine straining paper for filtering urushi | Ch.8 |
| Uma / Urushi-koshiki | Straining rig for filtering urushi under pressure | Ch.8 |
| Funzutsu | Bamboo/aluminum tube for sprinkling metal powder | Ch.9, Ch.23 |
| Maki-e | "Sprinkled picture" — gold/silver powder decoration | Ch.23 |
| Okime-egaki / Okime-tori | Design tracing / design transfer stages of maki-e | Ch.23 |
| Kindei | Gold powder (general term); see marufun, hiramefun, keshifun, hirameji, hyomon | Ch.23 |
| Hira maki-e | Flat sprinkled-gold maki-e | Ch.23 |
| Togidashi maki-e | Buried-and-ground-back maki-e | Ch.24 |
| Aratogi | First charcoal-burnishing pass revealing buried togidashi design | Ch.24 |
| Taka maki-e | Raised-relief maki-e | Ch.25 |
| Chinkin | Engraved, gold-filled line decoration | Ch.26 |
| Raden | Mother-of-pearl/shell inlay | Ch.27 |
| Rankaku | Eggshell inlay | Ch.27 |
| Kawari-nuri | Family of variant/textured surface effects | Ch.28 |
| Kintsugi | Ceramic repair using urushi/kokuso/sabi/maki-e vocabulary | Ch.29 |
Compiled from every chapter's cited sources above; see Chapter 38 for the full index.
Annotated Bibliography
Books
- Matsuda Gonroku, The Book of Urushi: Japanese Lacquerware from a Master (ISBN 978-4866580609). English translation of essays by the maki-e master and Living National Treasure discussed in Chapter 37. (Amazon / Apple Books) Possibly the same underlying text as The Story of Urushi below, published under different English titles — verify edition before buying both.
- Matsuda Gonroku, The Story of Urushi (ISBN 4-00-335671-3). Essays by the same author. (Listed via Guild LacArt)
- Günther Heckmann, Urushi no Waza (ISBN 3-9805755-0-0). Technical materials-and-technique reference. (Guild LacArt)
- Mitsuyoshi Atsuta, Urushi Craftsman in Paris (ISBN 978-4-560-09508-9). On Sugawara Seizo, called "the father of Urushi art in Europe." (Guild LacArt)
- Akiyoshi Totoki, Shigeki Kudo & Takaaki Nishikawa, Lacquering Technique (ISBN 978-4-416-71535-2). Photographically documented instructional guide. (Guild LacArt)
- Jussei, Jyussei Practice: Kawari-nuri (ISBN 4-88536-551-1). The standard technical reference for kawari-nuri (Ch.28). (Guild LacArt)
- Nagatoshi Onishi, Urushi Elegant Asia, World Urushi Culture Council. Travelogue on Asian lacquer culture's origins. (Guild LacArt)
- Monika Kopplin, European Lacquer (ISBN 978-3-7774-8930-8), and Kopplin, Emmerique, Bousquet & Rey, La Laque — Art et Techniques (Editions Vital). Global lacquer history and technique surveys. (Guild LacArt)
YouTube channels
- Tamenuri Studio — the single richest English-language video resource used throughout this guide; run by Michal Kulka.
- Fushimi Urushi Kobo — described independently as one of the best channels for step-by-step technique demonstration across multiple urushi methods. (Referenced via Tamenuri Studio's resource list.)
- Mejiro Urushi Studio — glossaries and training-program content. (urushigakusha.jp)
Websites & ongoing resources
- tamenuri.com — blog, FAQ, and glossary; the backbone of this guide's technical chapters.
- guildlac.art — Guild LacArt, technique reference and bibliography.
- Kyuseido's Library of Knowledge — well-photographed history/technique essays.
- Musubi Kiln Journal — maki-e and raden guides.
- urushigakusha.jp — Asian Lacquer Craft Exchange Research Project / Mejiro Urushi Studio.
Forums & communities
- fpgeeks and International Association of Penturners — pen-focused practitioner discussion.
- American Association of Woodturners Forum — bowl/turning-focused discussion.
Museums & academic
- Getty Conservation Institute — Urushi (conference proceedings PDF).
- V&A — Urushi Now: Contemporary Japanese Lacquer.
- National Crafts Museum (MOMAT) — Matsuda Gonroku exhibition.
- Conservation Wiki — Lacquer.
All links above are primary; see individual chapters for in-context citations of the same material.
Master Craftsman Case Studies
Matsuda Gonroku (1896–1986)
Designated a Living National Treasure for maki-e, Matsuda Gonroku is the figure most cited across the sources used in this guide. His preserved maki-e studio is maintained by Tokyo's National Crafts Museum (MOMAT), and he founded Kokkokai, a group of maki-e artists that collaborated directly with Pilot on what collectors still refer to as "AAA Grade" Namiki fountain pens — arguably the reason high-end maki-e fountain pens exist as a Western-accessible product category at all. (MOMAT; Pilot, Kokkokai) His own writing is the closest thing to a master's first-person technical text available in English translation — see Chapter 36.
Murose Kazumi
A contemporary Living National Treasure urushi artist, interviewed by Japan House London on his early inspiration and on what the Living National Treasure designation actually means for the craft's continuity. Useful as a living counterpoint to Matsuda Gonroku's historical example — the tradition is actively continuing, not preserved only in museums. (Japan House London)
Yukiko Hachiya
Introduced in Chapter 30: a rare craftsperson handling both woodturning and lacquering personally, trained at Tohoku University of Art & Design and the Ishikawa Prefectural Training Institute of Woodturning, working specifically in fukiurushi for functional, everyday-use bowls rather than decorative showpieces. (Nihonmono)
Michal Kulka / Tamenuri Studio
Not a Japanese-trained master, and presented here deliberately as a different kind of case study: a largely self-taught, Western practitioner whose year-plus of research before ever handling uncured urushi, and whose subsequent public documentation of failures and technique, is the single largest source base for this guide. His account is a useful, honest counterweight to the master-craftsman narrative above — proof the craft is learnable outside a traditional apprenticeship, at the cost of a genuinely long, forum-and-blog-assisted self-education. (Tamenuri Studio)
Wajima-nuri as a living regional tradition
Beyond individual makers, Wajima (Ishikawa Prefecture) is worth studying as a case study in itself — a lacquerware tradition with the ji-nuri ground process, jinoko earth, and roiro polishing methods cited throughout Part III, whose current technique lineage was established in the Kanbun era of the early Edo period, and whose oldest surviving documented piece is a vermilion door from Juzo Shrine dated to 1524. (Wikipedia, Wajima-nuri)
Full Source Index
Every distinct source cited anywhere in this guide, alphabetically, as a single reference list. Chapter-level citations throughout the guide link to the same URLs in context.
- American Association of Woodturners Forum — Faux "Urushi" Finish
- Architonic — Susanne Fritz: Urushi in Modern Design
- Japan Artisan Foundation — Roiro
- Japan Artisan Foundation — Shitaji-nuri
- Britannica — Hiramaki-e
- Britannica — Raden
- Britannica — Togidashi maki-e
- Chimahaga — Tools/Materials
- Conservation Wiki — Lacquer
- Danitrio — Knowledge of Maki-e
- Tokyo Traditional Crafts — Edo Hake
- Dictum — Urushi
- Dictum — Migakiko Polishing Powder
- Kintsugi Art — Hinoki and Bamboo Spatula
- Fine Woodworking — Using Urushi Lacquer in Your Home Shop
- Fine Woodworking Forum — Correcting Fisheyes on Lacquer
- fpgeeks — Urushi on Fountain Pens
- Getty Conservation Institute — Urushi
- Goenne — Urushi Allergy Guide
- Goenne — RED Urushi (hypoallergenic)
- Google Arts & Culture — Sendai Tansu
- Guild LacArt — Asian Lacquer
- Guild LacArt — Bibliography & References
- Iwayado Tansu — Japanese Traditional Furniture
- Japan House London — Murose Kazumi
- JAANUS — kokuso-urushi
- kintsugiblog — Sabi-urushi review
- Tsugu Tsugu — Filling Deep Chips with Kokuso
- Tsugu Tsugu — Filling Small Holes with Sabi-Urushi
- Tsugu Tsugu — Urushi Rash
- Kintsugi Art — Create a Muro
- Kintsugi Studio — Tools
- Kogei Japan — Iwayado Chests
- Kogei Standard — Mother-of-Pearl Inlay
- Kyuseido — In-Depth Introduction to Urushi Lacquer Art
- megu.space — Muro (The Curing Box)
- megu.space — Sabi Urushi & Kokuso
- MOMAT — Matsuda Gonroku exhibition
- Musubi Kiln — Guide to Maki-e Part 1
- Musubi Kiln — Guide to Maki-e Part 2
- Musubi Kiln — Raden
- Nakaya Fountain Pen
- Nakaya — Nakaya and Urushi Lacquer
- Nihonmono — Yukiko Hachiya
- On Fountain Pens — Urushi and Lacquering Techniques
- Pen Boutique — Maki-e, Chinkin, and More
- International Association of Penturners — Urushi Lacquer
- Pilot — Kokkokai
- PoJ Studio — Am I Allergic to Urushi?
- PoJ Studio — Hake Brush Set of 3
- ScienceDirect — Rapid and Sustainable Urushi Coatings
- ScienceDirect — UV-Induced Polymerization of Urushiol II
- Shizendo — Maki-e Gold Powders
- Suzanne Ross — Urushi FAQs
- Tamenuri Studio (home)
- Tamenuri Studio — Curing Urushi
- Tamenuri Studio — Fuki-urushi
- Tamenuri Studio — Furo
- Tamenuri Studio — How to start with urushi?
- Tamenuri Studio — Nanako-nuri tutorial
- Tamenuri Studio — Uwazuri
- Tamenuri Studio — Resources
- Tamenuri Studio — So, you want to start with urushi?
- Tamenuri Studio — Types of urushi
- Tamenuri Studio — Urushi rash
- Urushi Tsutsumi (home)
- Urushi Tsutsumi — Maki-e and Misc. Tools
- Watanabe Shoten — Mail order
- Urushi Stefos — Raden
- Wikipedia — Japanese lacquerware
- Wikipedia — Urushiol-induced contact dermatitis
- Wikipedia — Wajima-nuri
- Woodspirit Handcraft — Urushi Lacquer
- V&A — Urushi Now: Contemporary Japanese Lacquer