tutorial · Chinese

漆工艺修缮薄瓷胎盖碗|成鹽漆作 Lacquer ChengYan

This video demonstrates the structural repair and aesthetic restoration of a thin-walled porcelain gaiwan (lidded bowl) using natural lacquer. It is useful for lacquer artists and restorers working with fragile ceramic substrates that cannot support traditional cloth reinforcement. The process focuses on using mugi-urushi as a structural adhesive and filler, followed by surface finishing with colored lacquers.

A walkthrough written from 成盐漆作 Lacquer ChengYan’s video ↗. The recording is the authoritative demonstration; this page is a working guide to it.

Watch the source
Safety

Raw urushi (ki-urushi) causes serious delayed skin reactions; avoid direct skin contact during mixing and application. Read Safety First before working with raw urushi.

Tools shown

  • paper tape— Used to secure bonds and protect adjacent surfaces during filling
  • scalpel— Used for precise, small-amount filling and leveling
  • spatula— Plastic, metal, or rubber types; chosen based on required elasticity for curvature

Materials

  • mugi-urushi— Lacquer mixed with wheat flour; must be viscous enough to be pulled up with slight resistance
  • ki-urushi— Raw unrefined lacquer used for sealing the filler layer
  • kuro-urushi— Black lacquer used to fill small pits due to its thickness
  • soy-sauce purple lacquer— Custom mix of purple sugar, cinnabar red, and warm white lacquers

Conditions

  • cure time — 1-2 weeks for initial bond; up to 1 month for complete filling and refinement
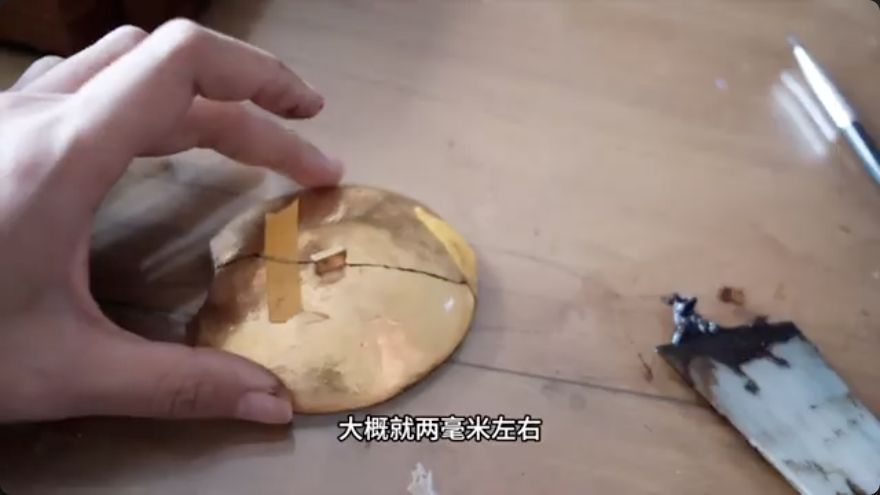
  • notes — Porcelain thickness approx. 2mm; no cloth reinforcement used due to fragility

The method

Section by section.

Each heading links back to the moment in the source video where it begins.

0:42 ↗

Prepare adhesive and bond fracture

Mix lacquer with wheat flour to create mugi-urushi. The consistency must be highly viscous, capable of being pulled up with slight resistance to ensure adhesion. Apply this mixture to the fracture surfaces of the porcelain to increase bonding strength. Secure the joined pieces with paper tape. Allow the bond to cure for one to two weeks, or longer if time permits, to ensure maximum strength.

When it is rightThe bond is secure and the tape holds the pieces firmly in alignment.

When it goes wrongIf the mugi-urushi is too thin, it will not provide sufficient adhesion; it must be thick enough to resist pulling.
1:39 ↗

Fill missing sections with mugi-urushi

For thin porcelain (approx. 2mm) with missing pieces, avoid cloth reinforcement or drilling. Instead, apply extra mugi-urushi to the gap. Use wider paper tape to protect adjacent areas. Fill the gap in small amounts over multiple passes. The first pass roughly shapes the form; subsequent passes use a scalpel to fill bit by bit until level. Scrape flat after each application. If the scalpel cannot achieve the desired curvature, switch to a spatula (plastic, metal, or rubber) based on elasticity needs.

When it is rightThe filled gap is level with the surrounding porcelain and follows the vessel's curvature.

When it goes wrongApplying too much at once can lead to uneven surfaces; fill in small increments to maintain control.

3:02 ↗

Refine and sand the repair

After one side is fully filled and cured, remove the paper tape. Fill the gap on the other side using the same incremental method. This process is slow, potentially taking three to four fills per side and up to a month for complete refinement. Once both sides are filled, check the curvature carefully. Sand and refine the repair area to ensure the thickness connects seamlessly with the original porcelain walls, maintaining the gaiwan's structural integrity and smooth profile.

When it is rightThe repair is sanded smooth, with no visible step or ridge between the filler and the original porcelain.

When it goes wrongInsufficient sanding leaves a visible ridge or uneven thickness, compromising the vessel's balance and appearance.

3:59 ↗

Seal and finish with colored lacquer

Apply a coat of ki-urushi to the repaired area using a fuki-urushi technique. Brush on the lacquer, allow it to seep into the lacquer-clay filler layer, then wipe off the excess. If small pits remain, fill them with kuro-urushi due to its thickness. Once the ki-urushi is complete, apply the custom soy-sauce purple lacquer (mixed from purple sugar, cinnabar red, and warm white) to match the owner's preference. Finish by sanding to achieve the desired matte texture.

When it is rightThe surface is smooth, matte, and uniformly colored, with the repair area indistinguishable from the original porcelain in texture and finish.

When it goes wrongIf the ki-urushi is not wiped back properly, it may leave a glossy or uneven surface; ensure thorough wiping to allow seepage into the filler.

Terminology in this video

麦漆mugi-urushi
Lacquer and wheat-flour adhesive
拭き漆fuki-urushi
Wipe-on wipe-back finish
金継ぎkintsugi
Lacquer repair finished in gold

Left open

What this video does not settle.

  • The exact proportions of the purple sugar, cinnabar red, and warm white lacquers used to create the soy-sauce purple color are not specified.
  • The specific type of sandpaper or abrasive used for refining the repair is not mentioned.
  • The exact curing environment (temperature and humidity) for the mugi-urushi and lacquer coats is not detailed.