Lacquer artist Yasuhiro Asai's "Kintsugi Workshop" Part 4 (with subtitles)
This video demonstrates the maki-e (sprinkled metal-powder decoration) stage of a gold-finished kintsugi repair on a vessel, following a previous session that ended with sabi ground application. It is useful for practitioners studying how this maker draws the lacquer line and applies No. 1 gold marufun. He discusses working on both the interior and exterior on the same day.
A walkthrough written from Asai Yasuhiro’s video ↗.
The recording is the authoritative demonstration; this page is a working guide to it.
Editorial safety guidance: avoid all skin contact with uncured urushi/e-urushi and contaminated tools; use suitable gloves and contained cleanup. The maker's pinky finger cot is fingerprint and powder control, not adequate personal protection from urushi exposure.
Read Safety First before working with raw urushi.
Tools shown
maki-e-hitsu (maki-e brush)— A neji-gawari fine maki-e line brush is used; a fine men-sō-hitsu is also listed. The maker mentions nylon or nail-art brushes but says he has not used them himself.
ke-bō (hair stick)— Loaded with gold powder for sprinkling
finger cot— Worn on right pinky to prevent fingerprints from attracting gold powder
Materials
e-urushi (painting lacquer)— Contains bengara (red iron-oxide pigment); described as quite stiff
No. 1 gold marufun (coarser round gold powder)— Primary powder used; round silver powder and keshifun (the finest gold powder) are mentioned as alternatives
non-drying oil (rapeseed or salad oil)— For brush cleanup after urushi (lacquer) work
Conditions
notes — The artist notes that judging the semi-dry (hiku-chi) timing is difficult because it varies with season, urushi (lacquer) origin, and sap type; the recommended approach is to sprinkle immediately after drawing rather than waiting for a specific drying state. Working on both interior and exterior on the same day is described as difficult; separating them across different days is suggested for less experienced practitioners.
The method
Section by section.
Each heading links back to the moment in the source video where it begins.
One video is one workshop's account, not a complete method. 2 of 4 steps here are not fully settled by
this source — it leaves out what a correct result looks like, or how the step
fails. Those are marked in place below.
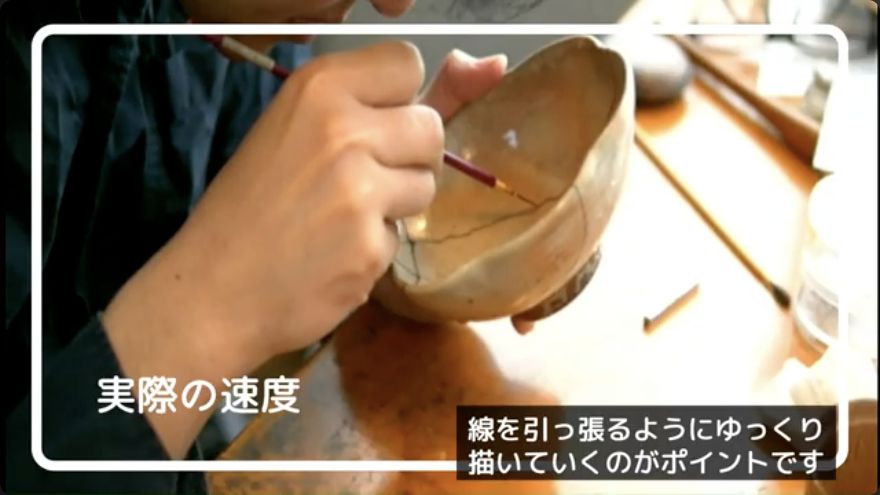
Select a fine maki-e line brush. The maker uses a neji-gawari brush and also lists a fine men-sō-hitsu; he mentions nylon and nail-art brushes but says he has not used them himself. He puts a finger cot on the right pinky to avoid fingerprints and stray powder, not as urushi PPE. The left hand rotates the vessel while the right draws. Touching the vessel is permissible if the pinky pivot is difficult, but keep the hand away from the fresh lacquer line so it is not stretched.
When it goes wrongContact with the wet line can put lacquer on the hand and stretch the drawn line.
Not settled by this video The source does not state what a finished, correct result looks like here.
Draw the pattern with stiff e-urushi (painting lacquer)
Load the brush with stiff e-urushi containing bengara red iron-oxide pigment. Pull the tip continuously to form the line while the left hand rotates the vessel to change the working angle. Work the interior first because the maker finds it more difficult; the exterior offers more room to support the hand. A slightly over-wide line is acceptable because powder will cover it, but an under-width line leaves the brown sabi or black lacquer visible beside the gold. Prioritise complete crack coverage over extreme thinness.
When it is rightA continuous, thin line of red-tinted urushi (lacquer) fully covering the crack or hole, with no gaps showing the brown sabi (tonoko-and-lacquer putty ground) or black surface beneath.
When it goes wrongLine narrower than the crack exposes sabi (tonoko-and-lacquer putty ground) or black urushi (lacquer) beside the gold; line stretched by hand contact. Recovery: ensure the line is at least as wide as the crack; avoid hand contact with wet urushi (lacquer).
After drawing the lacquer lines and before setting the line brush aside, thoroughly remove the urushi. The maker warns that residue can harden so the brush cannot be used next time. He cleans it with a non-drying oil such as rapeseed or salad oil.
When it goes wrongResidual urushi may harden and leave the brush unusable the next time it is needed.
Not settled by this video The source does not state what a finished, correct result looks like here.
Immediately after finishing the line, load the ke-bō (hair stick) with No. 1 gold marufun (coarser round gold powder) and sprinkle a slightly generous amount over the drawn urushi. Apply enough powder that the ke-bō bristles do not directly stroke the wet line, then remove excess. If a thick lacquer line absorbs the powder, wait about five minutes and check whether red lacquer has resurfaced; if so, add a second layer. The goal is a sharp, continuous gold line with no visible red or brown showing through.
When it is rightA sharp, continuous gold line with no red urushi (lacquer) or brown sabi (tonoko-and-lacquer putty ground) visible beneath or beside the gold.
When it goes wrongWith too little powder, the ke-bō bristles can directly stroke the wet lacquer and stretch it. If red lacquer resurfaces through sunken powder after about five minutes, add a second layer.
Terminology in this video
蒔絵maki-e
sprinkled metal-powder decoration
金継ぎkintsugi
lacquer-based repair; gold is one possible decorative finish
錆sabi
tonoko-and-lacquer putty ground
丸粉marufun
coarser round gold powder
毛棒ke-bō
hair stick used for sprinkling powder
絵漆e-urushi
painting lacquer
弁柄bengara
red iron-oxide pigment mixed into the e-urushi
乾口hiku-chi
the semi-dry state of urushi (lacquer) suitable for powder application
Left open
What this video does not settle.
The exact consistency or viscosity of the e-urushi is described only as 'quite stiff'; no specific bengara-to-lacquer ratio is given.
The specific type of vessel (ceramic, stoneware, porcelain) is not identified in the transcript.
The exact number of passes or the precise amount of gold powder per pass is not quantified; the guidance is qualitative ('slightly generous').
The vessel is held and rotated in the left hand, but the precise grip and support geometry are not specified.