showcase · English

Strange Tools I Use for Urushi

The maker of Tamenuri Studio walks through a personal collection of non-standard and improvised tools used in urushi work on pens and small vessels, explaining the purpose and basic handling of each. It is useful to a working lacquerer who wants to see how a single studio solves specific problems—extracting the last of tube lacquer, cutting raden strips, polishing textured surfaces, sprinkling metal leaf—with tools that are not part of the conventional Japanese kit. No complete technique is demonstrated end-to-end; the value is in the individual tool-use fragments.

A walkthrough written from Tamenuri Studio’s video ↗. The recording is the authoritative demonstration; this page is a working guide to it.

Watch the source
Safety

The maker explicitly states he is not allergic to urushi and uses finger cots only to keep his hands and the work surface clean, not as a protective barrier. This is a personal tolerance statement, not a safety recommendation. Raw urushi (ki-urushi) causes serious delayed contact dermatitis in most people; the absence of a reaction in one individual does not make the material safe. Anyone handling raw or mixed urushi should take appropriate precautions (gloves, barrier cream, avoidance of skin contact) regardless of what this particular maker does. Read Safety First before working with raw urushi.

Tools shown

  • tube wringer— Kitchen-style squeeze tool; used to extract residual urushi from tubes; maker also splits tubes open and scrapes crevices
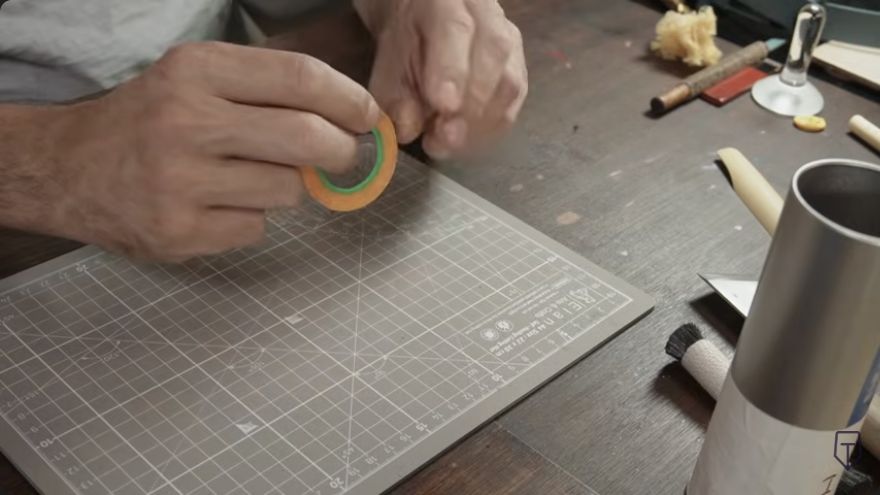
  • masking tape (rubber glue)— 1.5 mm and 1 mm widths; also paper and elastic-plastic variants; used to mask rings on a Montblanc 149 pen before lacquering
  • seafoam (piece)— Dabbed in thickened urushi and pressed onto the surface at varying angles to produce a chaotic kawari-nuri pattern; strong, leaves no residue if cleaned
  • Korean knife (DIY)— Single-bevel blade set into a wooden dowel, wrapped in cord and lacquered for grip; used for cutting raden strips, splitting small shell pieces, and cutting silk thread
  • hake (small, human hair)— Very small; held close for precision work inside a bowl or in tight spaces; also used for dusting and cleaning threads
  • hake (horsehair)— Stiffer than human-hair hake; used for hakeme-nuri
  • glass plate + mixing tool (small and large)— Small tool for small pigment-urushi mixes; large tool for 50 g or more; circular motion on glass to blend
  • finger cots— Worn on one or more fingers; keeps the maker's hand clean while the other fingers or tools work on the surface; used for maki-e and raden placement
  • stackable sieves (set of 20)— Grits from 8 to 350; separate particles from 2 mm down to roughly 0.125–0.16 mm; stacked largest-to-smallest and shaken to fractionate kanshitsu powder, crushed raden, or tonoko
  • bamboo needle tool— Lacquered bamboo stick with a needle at one end; multiple lengths, stiffnesses, and needle diameters (blunt to sharp); used for picking, repositioning raden, removing contaminants, piercing, cleaning threads, and protecting small crevices by inserting the needle, lacquering around it, then withdrawi
  • powder sprinkling tubes (bamboo and aluminium)— Sieve-tube form; grits from 350 up to large openings; held in hand and shaken to sprinkle maki-e powders, raden fragments, or ishime-ji particles; angle controls the working area of the sieve face
  • punch (2 mm, 1 mm, cone-shaped)— Cuts small circular pieces of raden; shell should be softened first
  • Japanese circular cutter (hollow)— Cuts softened shell in a circular motion; shell must be kept in warm water beforehand or it crushes
  • rotating cutter (leather tool)— Same principle as the punch but the blade rotates; faster for cutting circles; not suitable for all shell types
  • hammer— Used for cutting raden and for trimming/softening freshly cut hake hair
  • cutting mat— Protective surface for cutting raden and other tasks
  • bamboo gold-leaf cutting knife— Traditional Japanese form; maker prefers a European-style metal knife but keeps the bamboo one
  • skiving knife (Japanese leather)— Multiple blade widths; used to cut raden strips up to 5–6 cm long with even pressure along the blade; requires practice
  • horsehair bundle (dōzuri tool)— Horsehair joined with a wrap; loaded with polishing paste, dōzuri powder, filtered/sifted tonoko, or sumiko mixed with water or oil; used to polish textured or structured surfaces where flat sanding blocks cannot reach
  • metal-leaf cylinder (paper, tin-lined inside and out)— Holds gold, silver, or platinum leaf; tin coating prevents static attraction; multiple sizes from fine to large flakes
  • brush (for metal-leaf cylinder)— Used in conjunction with the cylinder to sprinkle leaf flakes onto wet urushi
  • magnifying headband (OptiVISOR, Donegan)— Multiple focal lengths; one works at ~15 cm distance for raden placement; another for closer work; one with additional spot magnification; exchangeable lenses; approximately 70–100 EUR
  • Sanwa wet stone— Mentioned as an option for flat-surface dōzuri
  • sanding block / sandpaper— Mentioned for flat-surface polishing before the horsehair tool is needed for textured areas

Materials

  • urushi (lacquer)— Used in tubes, thickened for kawari-nuri, wet for maki-e and raden adhesion; quantities range from small tube amounts to at least 50 g for pigment mixing
  • raden (mother-of-pearl)— Turban snail shell mentioned; cut into strips, circles (1–2 mm), and crushed fractions; must be softened in warm water before circular cutting
  • pigments— Mixed with urushi on a glass plate; small amounts and up to 50 g
  • kanshitsu (dried urushi)— Ground to powder for ishime-ji; separated into fractions via stacked sieves
  • tonoko (polishing clay)— Filtered or sifted; used in dōzuri polishing paste
  • sumiko (carbon powder)— Alternative to tonoko for dōzuri polishing
  • gold leaf / silver leaf / platinum leaf— Placed inside a tin-lined paper cylinder and sprinkled as flakes onto wet urushi
  • silk thread— Used in a pen-decoration technique; cut with the Korean knife
  • polishing paste— Applied with the horsehair dōzuri tool; mixed with water or oil

Conditions

  • notes — No furo conditions, ambient temperature, humidity, or drying/curing times are specified in the video. The maker works in a European studio (references to Amazon, Donegan, and European availability). The maker states he is not urushi-allergic, so no furo or protective-protocol details are given.

The method

Section by section.

Each heading links back to the moment in the source video where it begins.

One video is one workshop's account, not a complete method. 9 of 16 steps here are not fully settled by this source — it leaves out what a correct result looks like, or how the step fails. Those are marked in place below.

1:24 ↗

Extract urushi from tubes with a wringer

A kitchen-style tube wringer is loaded with the spent urushi tube and squeezed to draw out the residual lacquer. The maker notes that urushi is precious and that every trace should be recovered. In more extreme cases the tube is split open and the interior crevices are scraped to collect the last film of lacquer. The same tool can be used for any viscous tube product, but the maker's stated purpose is urushi recovery.

When it is rightThe tube is emptied as completely as practical; no visible film remains in the interior.

When it goes wrongResidual lacquer left in the tube is wasted. The maker's remedy is to split the tube and scrape the walls.
2:07 ↗

Mask with narrow rubber-glue tape

Narrow masking tape with a rubber (non-synthetic) adhesive is applied to the surface to protect areas that must not receive lacquer. The maker uses a 1.5 mm width for masking the rings on a Montblanc 149 pen and keeps a 1 mm width for finer work. Other widths, paper-based tapes, and elastic-plastic tapes are also kept; the plastic variants can be shaped around more complex geometries. The rubber adhesive is chosen because it leaves no residue or an easily removable residue after peeling.

When it is rightThe masked area is fully protected; the tape edge is crisp and does not bleed under the lacquer coat.

When it goes wrongSynthetic-adhesive tape can leave a sticky residue that contaminates the adjacent lacquer. The maker avoids this by specifying rubber-glue tape.

2:56 ↗

Apply thickened urushi with seafoam for kawari-nuri

A piece of seafoam (a dense, open-cell sponge) is dabbed into thickened urushi and then pressed or dragged across the surface. The maker states that the foam is strong enough to withstand repeated use without shedding fibres, and that it leaves no residue if cleaned properly. Because the foam's cell structure is non-uniform, each pass produces a slightly different chaotic pattern; changing the angle at which the foam contacts the surface shifts the pattern. This is the maker's method for kawari-nuri, an intentionally irregular or textured lacquer application.

When it is rightA non-repeating, organic texture is visible on the surface; no foam fibres are embedded in the wet lacquer.

When it goes wrongA weaker sponge would shed particles into the lacquer. The maker selects seafoam specifically for its strength and clean release.

3:51 ↗

Cut and split raden with a single-bevel Korean knife

A DIY knife—single-bevel blade set into a wooden dowel, the joint wrapped in cord and secured with a coat of urushi for a solid grip—is used for several raden tasks. The maker cuts raden into thin strips, splits very small pieces of shell, and cuts silk thread used in a pen-decoration technique. The single bevel makes the blade easy to sharpen and easy to control. The maker notes the knife is technically a scraper in its original Korean context, used with raden strips that are glued down with a layer of urushi and then struck to break the shell into placed fragments.

When it is rightClean, even cuts through the shell; small pieces are split without shattering.

Not settled by this video The source does not show what going wrong looks like here.

5:21 ↗

Lacquer in tight spaces with a small hake

A very small hake (lacquer brush) of human hair is held close to the ferrule for precision. The maker uses it to lacquer the interior of a bowl and to work in small, confined areas where a larger brush cannot reach. The same small hake is also used for dusting surfaces and for cleaning threads. A separate, stiffer horsehair hake is reserved for hakeme-nuri. The maker notes that hake arrive with uncut hair; the working length is trimmed, and the cut end is softened with a hammer.

When it is rightAn even coat is laid in the confined area without the brush bristles leaving visible drag marks.

Not settled by this video The source does not show what going wrong looks like here.

6:14 ↗

Mix pigment with urushi on a glass plate

Pigment and urushi are placed on a glass plate and blended with a small mixing tool using a circular motion. The maker keeps two sizes: a small tool for small batches (the amount is not specified beyond 'small') and a larger tool used when mixing at least 50 g of urushi with pigment. The glass surface allows the mixture to be worked without absorbing lacquer, and the circular motion is stated to produce a thorough blend. The maker notes that good results are achievable at home with small quantities using the smaller tool.

When it is rightA uniform, streak-free coloured lacquer with no visible dry pigment particles.

Not settled by this video The source does not show what going wrong looks like here.

7:10 ↗

Use finger cots for maki-e and raden placement

Individual finger cots are worn on one, two, or more fingers. The maker states two purposes: keeping his own fingers clean (he is not urushi-allergic, so the cots are not a safety measure) and keeping the surface of the pen clean. In practice, one cotted finger rests on the pen surface to stabilise it while another tool works on raden placement or maki-e detail. The cots prevent skin oils and fingerprints from contaminating the wet lacquer.

When it is rightThe work surface remains free of fingerprints and skin oils; the maker can stabilise the object with one finger while working with a tool in the other hand.

Not settled by this video The source does not show what going wrong looks like here.

8:08 ↗

Fractionate powders with stacked sieves

A set of 20 stackable sieves, ranging from 8 to 350 grit, separates particles from 2 mm diameter down to approximately 0.125–0.16 mm. To fractionate a powder, the sieves are stacked largest opening on top to smallest on the bottom, the powder is added to the top, and the stack is shaken. Each level retains its own particle size range. The maker uses this for kanshitsu powder destined for ishime-ji, for crushed raden separated into grits, and for tonoko or other powders where larger particles must be removed. The sieves were purchased from China at a fraction of the price of equivalent products on Amazon.

When it is rightEach sieve level contains a distinct, uniform particle size; no cross-contamination between fractions.

Not settled by this video The source does not show what going wrong looks like here.

10:19 ↗

Use a lacquered bamboo needle for fine manipulation

A lacquered bamboo stick with a needle at one end is kept in multiple lengths, stiffnesses, and needle diameters, with either a blunt or a very sharp tip. The maker lists a range of uses: picking material off a surface, repositioning raden pieces, removing contaminants from urushi, piercing, cleaning threads, and ensuring urushi reaches into crevices. One specific technique described: the needle is inserted into a small area, lacquer is applied around it, the needle is left in place for a moment, and then withdrawn, leaving a protected or defined opening. The tool is described as extremely universal.

When it is rightFine manipulation is achieved without the operator's fingers contacting the work surface.

Not settled by this video The source does not show what going wrong looks like here.

11:18 ↗

Sprinkle powders with a sieve-tube

A tube (bamboo or aluminium) with a fine sieve at one end holds maki-e powders, raden fragments, or ishime-ji particles. The maker loads the powder inside, holds the tube in hand, and shakes it to sprinkle the surface. Changing the angle of the tube changes both the amount of material released and the effective area of the sieve face in contact with the powder. The maker notes that the motion and angle control take practice. The tubes range from a 350-grit opening up to much larger sieves. The maker calls the tool indispensable for urushi work involving powders.

When it is rightAn even, controlled distribution of powder over the target area; the operator can adjust density by angle and shake intensity.

Not settled by this video The source does not show what going wrong looks like here.

12:35 ↗

Cut circular raden pieces with punches and rotating cutters

Three tools are used for cutting small circles from mother-of-pearl. A simple punch in 2 mm and 1 mm diameters, and a cone-shaped variant, are pressed through the shell. A Japanese hollow circular cutter is used with a circular motion, but the shell must first be softened by soaking in warm water; if the shell is dry it will crush rather than cut. A leather-industry rotating cutter works on the same principle but the blade rotates, allowing faster cutting; the maker notes it is not suitable for all shell types. The maker demonstrates with a piece of turban snail shell, acknowledging it is dry and will crush, to show the mechanism.

When it is rightA clean, round piece of shell is separated without chipping or cracking.

When it goes wrongCutting dry shell with the hollow cutter causes it to crush. Remedy: soften the shell in warm water first.

14:31 ↗

Trim and soften hake hair with a hammer

Hake arrive with uncut hair. When the working portion of the hair is worn out, the maker trims it to the desired length and then uses a hammer to soften the cut end. The hammer is also used for cutting raden. The maker does not specify the type of hammer or the exact technique of softening beyond striking the cut hair.

When it is rightThe trimmed hake tip is flexible enough to lay lacquer evenly without the stiff cut end leaving marks.

Not settled by this video The source does not show what going wrong looks like here.

15:39 ↗

Cut raden strips with a Japanese skiving knife

A Japanese leather skiving knife, available in several blade widths, is used to cut raden into strips. The maker describes it as the best tool for the job and notes it requires practice. With practice, even pressure can be applied along the whole blade length, allowing strips of 5–6 cm (about 2 inches) to be cut in a single pass. The maker has seen this tool used by other raden craftsmen and considers it popular in the field.

When it is rightA straight, even strip of shell 5–6 cm long, cut without tearing or chipping along the length.

When it goes wrongUneven pressure produces a strip that tapers or breaks. Remedy: practise applying uniform pressure along the full blade.

16:33 ↗

Polish textured surfaces with a horsehair dōzuri tool

A bundle of horsehair joined with a wrap is loaded with a polishing paste, or with dōzuri powder, filtered or sifted tonoko, or sumiko (carbon powder) mixed with water or oil. The tool is worked over the surface to bring up a gloss on textured or structured areas where flat sanding blocks, a Sanwa wet stone, or sandpaper cannot conform. The maker notes that flat-surface dōzuri is straightforward with conventional tools, but the horsehair bundle is the solution for intentionally textured surfaces that still require a polished finish. The tool can also be used to polish between pieces of raden. The maker shows residue of the polishing paste on the surface, indicating the tool was recently used and the paste has not yet been removed.

When it is rightA visible gloss is achieved on the textured surface without flattening the intended texture.

When it goes wrongUsing a flat sanding block on a textured surface will flatten the texture. The horsehair tool conforms to the relief.

18:11 ↗

Sprinkle metal leaf flakes with a tin-lined cylinder and brush

Gold, silver, or platinum leaf is placed inside a paper cylinder whose interior and exterior are coated with tin. The tin lining is critical: it prevents static electricity buildup, which would otherwise attract the extremely light metal leaf and prevent controlled release. A companion brush is then used to sprinkle the leaf from the cylinder onto the surface of wet urushi, breaking it into very small flakes. The maker has cylinders in multiple sizes, from fine flakes to much larger ones. The flakes adhere to the wet lacquer surface. This is described as another form of maki-e and is also applicable to other techniques. The maker notes that the two tools (cylinder and brush) are used together as a pair.

When it is rightFine, evenly distributed metal flakes adhere to the wet urushi surface without clumping or static-driven scattering.

When it goes wrongWithout the tin lining, static electricity attracts the leaf to the cylinder walls and prevents even release. The maker specifies the tin coating as the solution.

20:20 ↗

Use a magnifying headband for precise raden placement

A magnifying headband (OptiVISOR by Donegan, approximately 70–100 EUR, with exchangeable high-quality lenses) is worn to magnify the work area. The maker keeps several with different focal lengths and working distances. One is used for raden work at a working distance of roughly 15 cm. A stronger lens requires the maker to work much closer. A lens with additional spot magnification is used for inspecting very tight, very small areas. The maker states that placing 1 mm diameter circles of mother-of-pearl precisely in a grid that aligns along and around a pen, with each circle oriented the same way in terms of light reflection, is extremely difficult even with 20/20 vision, and that the headband is the only solution he can think of. The maker has tried at least five different headbands and considers the Donegan OptiVISOR the best, though availability in Europe is inconsistent.

When it is rightThe operator can see and place 1 mm raden circles in a precise, aligned grid with consistent orientation.

Not settled by this video The source does not show what going wrong looks like here.

Terminology in this video

変わり塗kawari-nuri
An intentionally irregular or textured lacquer application, here achieved by dabbing thickened urushi with seafoam at varying angles
刷目塗hakeme-nuri
A lacquering technique using a stiffer horsehair hake
砥塗dōzuri
The sanding and polishing stage, here applied to textured surfaces with a horsehair tool loaded with tonoko, sumiko, or polishing paste
乾漆kanshitsu
Dried urushi ground to powder, used here in ishime-ji technique after fractionation through sieves
石目地ishime-ji
A ground technique using kanshitsu powder or similar particles
螺鈿raden
Mother-of-pearl inlay; here cut into strips, circles, and crushed fractions for decoration
蒔絵maki-e
Sprinkled metal-powder decoration on wet lacquer; the maker's metal-leaf flake technique is described as a form of maki-e
溜塗tamenuri
Transparent lacquer over a coloured ground; the name of the studio (Tamenuri Studio)
砥の粉tonoko
Fine polishing-clay powder, used in dōzuri and for filtering through sieves
墨粉sumiko
Carbon powder, an alternative to tonoko for dōzuri polishing
刷毛hake
Lacquer brush; human-hair and horsehair variants are used for different applications
skiving
The leather-working term for thinning material, especially at edges; here applied to cutting raden strips with a Japanese leather skiving knife

Left open

What this video does not settle.

  • No visual track is available, so the physical appearance, size, and exact form of every tool described cannot be independently verified. All descriptions rely solely on the speech track.
  • The exact consistency of the 'thickened urushi' used with the seafoam for kawari-nuri is not specified (ratio of urushi to filler or degree of thickening).
  • The specific dōzuri powders or polishing paste the maker uses with the horsehair tool are listed (tonoko, sumiko, dōzuri powders, polishing paste) but the exact product or grade is not named.
  • The maker mentions a 'Sanwa wet stone' for flat-surface dōzuri but does not demonstrate or describe its use in detail.
  • The exact grit-to-millimetre correspondence of the 20 sieves is given as a range (8 to 350 grit; 2 mm down to ~0.125–0.16 mm) but the intermediate steps are not enumerated.
  • The maker references a 'previous video' where basic tools and hake were discussed in detail; that context is not available here.
  • The specific silk-threading technique on the pen is mentioned but not described.
  • The maker's full workflow (substrate preparation, ground layers, number of coats, furo schedule) is not covered in this video; it is a tool showcase, not a process walkthrough.